Samsung Galaxy S 4G Disassembly/Disassemble Guide

This is only a teardown but also works as disassembly guide if you want to removed  and replace the battery, LCD screen replacement, cleaning or fixing something etc. 

Here's the step by step guide on how to disassemble the Samsung Galaxy S 4G. You may need an opening tools like Philips screwdriver #00, plastic opening tools, heat gun and your burnt fingers.


Samsung Galaxy S 4G Teardown

Samsung Galaxy S 4G PCB Board Components Layout

Here's the Samsung Galaxy S 4G PCB board which shows the components and IC's mounted or used in the circuit. The major IC's used were labeled as a reference and familiarization of the entire PCB board layout.

Samsung Galaxy S 4G front PCB Motherboard IC Components:
     Maxim MAX8987 DC Power Management
     Samsung KB100L00WM-A453 4Gb (512 MB) of mobile DRAM which contains a 1 GHz Intrinsity Processor in a package-on-package configuration, according to the fine folks at
     ST Ericsson's THOR M5730 HSPA+ Thin Modem
     ST Ericsson GNS7560 Single Chip GPS Solution
     Bosch Sensortec Accelerometer

View the high resolution version of this image.


Samsung Galaxy S 4G Back PCB Motherboard IC Components:


     Broadcom BCM4329 802.11n Wi-Fi, Bluetooth 2.1, and FM Tuner
     ST Ericsson RF5000 Radio Transceiver (part of THOR M570 chipset)
     Wolfson Microelectronics WM8994 Audio CODEC
     Skyworks SKY77447 Load Insensitive Power Amplifier for WCDMA / HSDPA / HSUPA / HSPA+ Band II
     Skyworks SKY77544 TX-RX Front End Module
     Skyworks SKY77460 WCDMA/HSPA+ Power Amplifier

View the high resolution version of this image.

The Samsung Galaxy S 4G compact front and rear  camera assembly flex board.


It uses a NEC MC10170 Image Processor cleverly mounted right to its ribbon cable.


The Samsung Galaxy S 4G headphone jack, earpiece speaker, and proximity/ambient light sensors Flex cable.


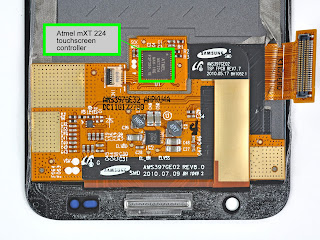
Back of the display assembly mounted the Atmel mXT 224 touchscreen controller.


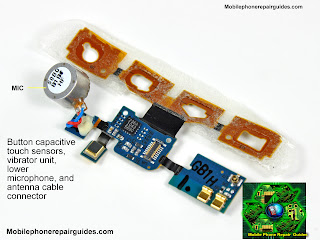
The removed button capacitive touch sensors, vibrator unit, lower microphone, and antenna cable connector mounted on the same flex assembly.

There you have it the labeled Samsung Galaxy S 4G PCB Board, That's all folks!

Samsung I9000 Galaxy S Not Charging Problem Solution

This repair guide covers for Samsung I9000 Galaxy S with charging problem. The guide below shows the specific components on Samsung Galaxy S I9000 PCB board that holds for charging operation.

If the device failed to charge and already tried another working battery charger on the device but the problems still exist., Just refer to the given solution and follow the steps procedures on how to troubleshoot the charging failure problem on the device.

1. Clean the USB pin connector if oxidized. Resolder if the pins are lifted.
2. Plug the battery charger, check the VBUS voltage, if the voltage is missing replace another charger.
3. Check the VBUS 5V voltage at the higlighted capacitor.
4. If the 5V voltage is missing on the capacitor, rework or replace the IC.
5. Reheat, rework the IC labeled 5. 

Nokia C3-01 Sevice Hints for Hardware Repair Problems

This is  Nokia C3-01 Service Hints for hardware problems. This is used by mobile phone technician as manual for repairs.

This manual provides the the step by step procedures on how to repair the phone when problem occurred like, display problem, keypad, problem, power problem, not charging problem, display and keypad illumination led problem, bluetooth problem, netwoirk problem.


Download Nokia C3-01 Service Hints

Samsung ZV50 Service Manual / Wiring Diagram / Schematic Diagram

This is the service manual of Samsung ZV50  mobile phone., used by mobile phone technician for repair and troubleshooting hardware problems like:
1.Samsung ZV50 LCD replacement
2.Samsung ZV50 Display problem
3.Samsung ZV50 keypad problem
4.Samsung ZV50 Not charging,
5.Samsung ZV50 Backlight LED problem,
6.Samsung ZV50 Earpiece problem
7.Samsung ZV50 Microphone problem
8.Samsung ZV50 Buzzer speaker problem
9.Samsung ZV50 No network problem
10.Samsung ZV50 Bluetooth problem

The Samsung ZV60 Service Manual table of contents:
   1. Safety Precautions
   2. Specification
   3. Operation Instruction and Installation
   4. Array course control
   5. Exploded View/Disassembly and Assembly Instructions
   6. MAIN Electrical Parts List
   7. Block Diagrams
   8. PCB Diagrams / Wiring Diagram / Schematic Diagram
   9. Flow Chart of Troubleshooting
  10. Reference data

Download Samsung ZV50 Service Manual

1. Safety Precautions
1-1. Repair Precaution
Repair in Shield Box, during detailed tuning. Take specially care of tuning or test, because specipicty of cellular phone is sensitive for surrounding interference(RF noise). Be careful to use a kind of magnetic object or tool, because performance of parts is damaged by the influence of magnetic force. Surely use a standard screwdriver when you disassemble this product, otherwise screw will be worn away. Use a thicken twisted wire when you measure level. A thicken twisted wire has low resistance, therefore error of measurement is few. Repair after separate Test Pack and Set because for short danger (for example an overcurrent and furious flames of parts etc) when you repair board in condition of connecting Test Pack and tuning on. Take specially care of soldering, because Land of PCB is small and weak in heat. Surely tune on/off while using AC power plug, because a repair of battery charger is dangerous when tuning ON/OFF PBA and Connector after disassembling charger. Don't use as you pleases after c
hange other material than replacement registered on SEC System. Otherwise engineer in charge isn't charged with problem that you don't keep this rules.

1-1

SAMSUNG Proprietary-Contents may change without notice
This Document can not be used without Samsung's authorization

Safety Precautions

1-2. ESD(Electrostatically Sensitive Devices) Precaution
Several semiconductor may be damaged easily by static electricity. Such parts are called by ESD (Electrostatically Sensitive Devices), for example IC,BGA chip etc. Read Precaution below. You can prevent from ESD damage by static electricity. Remove static electricity remained your body before you touch semiconductor or parts with semiconductor. There are ways that you touch an earthed place or wear static electricity prevention string on wrist. Use earthed soldering steel when you connect or disconnect ESD. Use soldering removing tool to break static electricity. , otherwise ESD will be damaged by static electricity. Don't unpack until you set up ESD on product. Because most of ESD are packed by box and aluminum plate to have conductive power,they are prevented from static electricity. You must maintain electric contact between ESD and place due to be set up until ESD is connected completely to the proper place or a circuit board.

1-2

SAMSUNG Proprietary-Contents may change without notice
This Document can not be used without Samsung's authorization

2. Specification
2-1. GSM General Specification
EG SM 900 Fr eq. Band [MHz] Up link/ Do wnl ink ARFCN ran ge Tx/Rx spacin g Mod . Bit r ate/ Bi t Peri od Tim e Slot Per iod/ Fra me Per iod GSM/ G PR S Modu lation EDG E MS Power Po wer Class Sen sitivity TDMA M ux Cell Radius 8PSK 8PSK 8PSK 2 4dBm ~ - 50dBm 3 (max +24dBm) - 106.7 dBm 880~9 15 925~9 60 0~1 24 & 975~1 023 45MHz 270.8 33kbps 3.69 2us 576. 9us 4 .615ms 0.3G MSK DCS1 800 1710~1 785 1805~1 880 512~8 85 95MHz 270.8 33kbps 3.69 2us 576. 9us 4 .615ms 0.3G M SK PCS1 900 1850~1 910 1930~1 990 512~8 10 80MHz 270.8 33kbps 3.69 2us 576. 9us 4 .615ms 0.3G MSK QPSK HQPSK W- CDMA 1 920~19 80 2 110~21 70 UL:9 612~98 88 DL:10 562~10 838 190MHz 3. 84Mcps

F rame l ength : 10ms Slot lengt h : 0. 667ms

33dBm~ 5dBm 30dBm~ 0dBm 30dBm~ 0dBm 4 (max +33dBm) - 102dBm 8 35Km 1 (max +30dBm) - 100dBm 8 2Km 1 (max +30dBm) - 100dBm 8 2Km

Samsung ZV60 Service Manual, Wiring Schematic Diagram

The Samsung ZV60 Service Manual, used by mobile phone technician for repair and troubleshooting hardware problems like LCD replacement, display problem, keypad problem, Not charging problem, Backlight LED problem, No Network Signal Problem Etc..
This is the service manual of Samsung ZV60mobile phone.
The Samsung ZV60 Service Manual table of contents:
   1. Safety Precautions
   2. Specification
   3. Operation Instruction and Installation
   4. Array course control
   5. Exploded View/Disassembly and Assembly Instructions
   6. MAIN Electrical Parts List
   7. Block Diagrams
   8. PCB Diagrams / Wiring Diagram / Schematic Diagram
   9. Flow Chart of Troubleshooting
  10. Reference data

Download Samsung ZV60 Service Manual

How to Factory Reset the Contents and Settings on Apple iPad 2

Here's how to Factory Reset the Settings or Erase the Contents on Apple iPad 2 after installing and removing many applications and you want it restore back to its original settings.
apple ipad 2 factory data reset manual
   1. On the Apple iPad 2 home screen, select the Settings icon
   2. Select General in the menu to the left of the screen, then tap Reset
   3. The two options shows:
         1. "Reset All Settings" will restore all of your app settings to their original status
         2. "Erase All Content and Settings" will reset all app settings and erase all of your data (photos, apps, bookmarks, music, etc.)
   4. The iPad 2 will then reboot after selecting one of the two options above,
   5. If you selected "Erase All Content and Settings", you will need to reconnect your iPad 2 to iTunes in order to reactivate it

Samsung I100 Gem Soft/Hard Reset to Factory Default Settings

This procedure can be only done and may help, if the Samsung I100 Gem become sluggish from normal, or become unresponsive and experience some hang or frozen problem if using some applications.

If you want the Samsung I100 Gem to return it to its factory settings again. This procedure may help you to restore the phone from your customized settings to it s original state.

Note: This will permanently deleted all data stored or installed on your phone. But the data stored on the microSD card will not be removed. Just make a back up copy of all important files for assurance before proceeding.

Here's step by step instructions how to hard reset the Samsung Gem I100 .

Samsung Gem I100 - Factory Reset through Menu Settings,

1. On the main home screen, tap menu
2. Tap Settings, then tap Privacy
3. Tap Factory data reset
4. Tap Reset phone
5. Enter the password if prompted, then to confirm just tap Erase everything

Samsung Gem I100 Hard Reset, this may help if the phone is unresponsive or frozen.

1. If your Samsung Gem is frozen, Turn off the power, remove the battery and reinsert it back again
2. Hold the Volume Down button
3. Press and hold the Power button until the device turns on
4. You are now presented with a menu that allows for Fastbook, Recovery, Clear Storage, and Simlock
5. Select Clear Storage by pressing the Volume Down button
6. Press and release the Power button
7. Select Volume Up for YES and Volume Down for NO
Once the reset process completes, It will then reboot. Your Samsung Gem will then return back to its original  factory default settings.

LG Optimus V Hard Reset to Factory Settings Procedures

This are the steps instruction on how properly restore or hard reset the LG Optimus V VM670 to return to its original factory setting. 

Please note: do no take it so lightly, performing a factory or hard reset will permanently delete all data from the LG Optimus V VM670 as a result of this procedure. This process will not delete thrdata stored on the microSD card. Just make a back up copy before you may proceed.

Factory Data Reset through MENU settings:
1. From the main home screen, tap menu
2. Tap Settings, then Privacy
3. Tap Factory data reset
4. Tap Reset phone
5. Enter your password if required, then tap Erase everything to confirm

If LG Optimus V phone is frozen, try to restart the phone by pulling the battery out and do a key reset combination.

1. Turn the power off, pull the battery out and reinsert it
2. Hold the Home and Volume Down button
3. Press and hold the Power button until the device turns on
4. Follow the on-screen instructions to reset your device

The phone will reboot to its factory fresh state.All data including third-party applications will be deleted from the LG Optimus V. Once the wipe is complete,

Sprint HTC Arrive Soft /Hard Reset, Format Factory Settings

There are still plenty of options and an ever-growing list of apps and games available in the Windows Marketplace for HTC Arrive. But the tweaking may end up if you decide to sell or give to others your HTC Arrive and buy a new phone. And you want to restore the settings to its original default settings so that all of your files and personal information cleared from memory..
htc arrive hard reset

Here's a steps on how to hard reset your HTC Arrive:

   1. On the home screen, swipe left to expose your app list
   2. Tap Settings
   3. Scroll down and tap about
   4. Tap reset your phone
   5. Tap yes to confirm, then tap yes to confirm again

The phone will then reboot and return with a factory fresh settings.

Sony Ericsson G705 Disassembly/Disassemble Manual

This is Sony Ericsson G705 Disassembly and Reassembly Manual. A step by step guide to properly and safetly dismantle the phone if repair service is taken like, LCD screen Display proble, keypad problem, Audio speaker problem, Sim card problem, cahrging problem etc.
Sonyericsson

This features the following step by step disassembly for:
-Battery cover
-Battery
-Rear Cover
-MAin PCB
-SIM Flex/Carrier unit
-Co-branding
-Screw Sheets
-Front Cover
-Navigation key unit
-Display

And for Reassembly the:
-Display
-Navigation key unit
-Front Cover
-Screw Sheets
-Co-branding
-SIM Flex/Carrier unit
-MAin PCB
-Rear Cover
-Battery
-Battery cover

Download Sony Ericsson G705 Disaasembly/Disassemble Manual

Sony Ericsson Spiro W100i Volume Up/Down Button Switch Repair Manual

IF having problem with the volume UP/Down control button switch of Sony Ericsson Spiro W100i or W100a, you may refer to the solution repair guide below for it shows the connection paths of the volume switches. This may help if the solder pads of the volume key switches is damaged or lifted or it doesn't work at all, after changing or replacing it.

The volume up and down switches of Sony Ericsson Spiro W100i and W100a is connected to the Keypad filter IC and associated the keypad keys 1, 4, 7 and * star. If both said keypad keys also doesn't work, you may then consider that the problem lies on a faulty EMI filter IC. Replacing it might well fix the problem.

Sony Ericsson Spiro W100i Earpiece Speaker Problem Repair Guide

Here's the Sony Ericsson Spiro w100i,W100a solution for not working earpiece speaker. This repair guide provides some simple step by step procedures on how to fix the earpiece speaker problem.

SE spiro w100i earpiece speaker jumper ways
Sony Ericsson Spiro W100i Earpiece Speaker Problem Repair Hints:
1. Check the Earpiece Speaker using a multimeter, clean if oxidized or replace if found damaged.
2. Check the Flex ribbon cable wire, replace if damaged.
3. Check or replace the filter coils and capacitors.

Sony Ericsson Spiro W100i LCD Screen Display Problem Repair Solution

This repair guide covers for Sony Ericsson Spiro W100i, W100a Display problems on LCD Screen. The following guide below shows which particular components needs to be check first if a display occurred such as garbled, white, saturated, blank or empty screen displays.

For display problems repairs,if the LCD screen is not damaged, broken or cracked, you may try to restore or flash the device firmware firmware first before doing doing any hardware troubleshooting. If the problem still exists and confirmed that the the phone's firmware is okay, you may then proceed into hardware troubleshooting procedures.

Sony Ericsson LCD Display problem repair manual
Repair hints on Sony Ericsson Spiro LCD Screen Display Problems.
1. Check the LCD Screen Module, have a new LCD screen replacement if damaged.
2. Check the LCD flex ribbon cable wire, replace if damaged.
3. Check the Flex Pin Connectors, clean if oxidized, resolder and replace if necessary.
4. Check the upper keypad PCB board. Replaced if damaged.
5. If the above procedures won't fix the problem, re-hot or rework the CPU IC.

Sony Ericsson Spiro W100i,W100a Keypad Problem Jumper Ways Solution

This repair guide may help fix the Sony Ericsson Spiro W100i,W100a not working keypad problem.
This solution may works if you already cleaned the Keypad matrix and the keypad membrane but nothing happens and the keypad keys still doesn't work.

Observe the solution below for it shows the connection line paths of each particular keys of Sony Ericsson W100i and W100a phone.
SE w100 keypad jumper Ways
This solution also includes which components needs to be check and replace such as the two keypad filter IC's and 0 ohms resistors. Just locate this components on the Sony Ericsson W100i or W100a PCB board. Just check and then replace these components if found damaged.

HTC Desire S Hard Reset, Format to Factory Settings Procedures

This may help If your phone becomes unresponsive or sluggish, try restarting your phone and see if that helps. In case your phone has a persistent problem that cannot be solved, the last resort is to do a factory reset.

Here's how to do a Factory Reset and Hard Reset the HTC Desire S  from HTC support.

Restarting your phone (soft reset)
If your phone is running slower than normal, an application is not performing properly, or your phone becomes unresponsive, try restarting your phone and see if that helps solve the problem. To restart your phone, simply turn it off and back on. If pressing and holding the POWER button doesn't work, then remove the battery, wait for a few seconds, reinsert the battery, and then turn the phone on.
Performing a factory reset (hard reset)
If you're passing your phone on to someone else or your phone has a persistent problem that cannot be solved, you can do a factory reset (also called a hard reset). This returns your phone to the state it was in before the first time you turned it on.

Please Note: Factory reset will not remove the data and files that are in your phone’s microSD card.
Factory reset is not a step to be taken lightly. It will permanently delete all your data and customized settings, and will also remove any applications you've downloaded and installed. Be sure to back up any data and files you want to keep before you do a factory reset.

HTC Desire S - Factory reset via settings
The most convenient way to do a factory reset is via the phone settings.

   1. From the Home screen, press MENU
   2. Tap Settings.
   3. Scroll down the screen and then tap Privacy > Factory data reset.
   4. On the Factory data reset screen, tap Reset phone.
   5. Then tap Erase everything.

HTC Desire S - Performing a factory reset using phone button combination.
If you cannot turn on your phone or access the phone settings, you can still perform a factory reset by using the buttons on the phone.

   1. With the HTC incredible S phone turned off, press and hold the VOLUME DOWN button, and then briefly press the POWER button.
      Note: If you are not sure whether your phone's power is turned off, remove and then reinsert the battery.
   2. Wait for the screen with the three Android images to appear, and then release the VOLUME DOWN button.
   3. Press VOLUME DOWN to select CLEAR STORAGE, and then press POWER.
   4. Press VOLUME UP to start the factory reset.

HTC Wildfire S Hard Reset, Format, Restore to Factory Settings

Here's how to do a Factory Reset and Hard Reset the HTC Wildfire S  from HTC support. This may help If your phone becomes unresponsive or sluggish, try restarting your phone and see if that helps. In case your phone has a persistent problem that cannot be solved, the last resort is to do a factory reset.

Restarting your phone (soft reset)
If your phone is running slower than normal, an application is not performing properly, or your phone becomes unresponsive, try restarting your phone and see if that helps solve the problem. To restart your phone, simply turn it off and back on. If pressing and holding the POWER button doesn't work, then remove the battery, wait for a few seconds, reinsert the battery, and then turn the phone on.
Performing a factory reset (hard reset)
If you're passing your phone on to someone else or your phone has a persistent problem that cannot be solved, you can do a factory reset (also called a hard reset). This returns your phone to the state it was in before the first time you turned it on.

Please Note: Factory reset will not remove the data and files that are in your phone’s microSD card.
Factory reset is not a step to be taken lightly. It will permanently delete all your data and customized settings, and will also remove any applications you've downloaded and installed. Be sure to back up any data and files you want to keep before you do a factory reset.

HTC Wildfire S - Factory reset via settings
The most convenient way to do a factory reset is via the phone settings.

   1. From the Home screen, press MENU
   2. Tap Settings.
   3. Scroll down the screen and then tap Privacy > Factory data reset.
   4. On the Factory data reset screen, tap Reset phone.
   5. Then tap Erase everything.

HTC Wildfire S - Performing a factory reset using phone button combination.
If you cannot turn on your phone or access the phone settings, you can still perform a factory reset by using the buttons on the phone.

   1. With the HTC incredible S phone turned off, press and hold the VOLUME DOWN button, and then briefly press the POWER button.
      Note: If you are not sure whether your phone's power is turned off, remove and then reinsert the battery.
   2. Wait for the screen with the three Android images to appear, and then release the VOLUME DOWN button.
   3. Press VOLUME DOWN to select CLEAR STORAGE, and then press POWER.
   4. Press VOLUME UP to start the factory reset.

HTC Incredible S Hard Reset, Format to Factory Settings

Here's a step by step instruction on how to Factory Reset and Hard Reset the HTC incredible S from HTC support. This may help If your phone becomes unresponsive or sluggish, try restarting your phone and see if that helps. In case your phone has a persistent problem that cannot be solved, the last resort is to do a factory reset.

Restarting your phone (soft reset)
If your phone is running slower than normal, an application is not performing properly, or your phone becomes unresponsive, try restarting your phone and see if that helps solve the problem.

To restart your phone, simply turn it off and back on. If pressing and holding the POWER button doesn't work, then remove the battery, wait for a few seconds, reinsert the battery, and then turn the phone on.
Performing a factory reset (hard reset)
If you're passing your phone on to someone else or your phone has a persistent problem that cannot be solved, you can do a factory reset (also called a hard reset). This returns your phone to the state it was in before the first time you turned it on.

Note: Factory reset will not remove the data and files that are in your phone’s microSD card.
Factory reset is not a step to be taken lightly. It will permanently delete all your data and customized settings, and will also remove any applications you've downloaded and installed. Be sure to back up any data and files you want to keep before you do a factory reset.
HTC incredible S - Factory reset via settings
The most convenient way to do a factory reset is via the phone settings.

   1. From the Home screen, press MENU
   2. Tap Settings.
   3. Scroll down the screen and then tap Privacy > Factory data reset.
   4. On the Factory data reset screen, tap Reset phone.
   5. Then tap Erase everything.

HTC incredible S - Performing a factory reset using phone button combinations.
If you cannot turn on your phone or access the phone settings, you can still perform a factory reset by using the buttons on the phone.

   1. With the HTC incredible S phone turned off, press and hold the VOLUME DOWN button, and then briefly press the POWER button.
      Note: If you are not sure whether your phone's power is turned off, remove and then reinsert the battery.
   2. Wait for the screen with the three Android images to appear, and then release the VOLUME DOWN button.
   3. Press VOLUME DOWN to select CLEAR STORAGE, and then press POWER.
   4. Press VOLUME UP to start the factory reset.

HTC Salsa Hard Reset, Format to Factory Default Settings

Please Note:  Performing this procedure will delete all data stored  from the HTC Salsa. The data stored on the microSD memory card  may or may not be deleted . We advice to back up all of important personal data before proceeding.

Here's the step by step procedures how to hard reset the HTC Salsa  to clear all data and restore it back to its original factory fresh default settings.

HTC Salsa  Factory Reset through Menu Settings

   1. From the main home screen, Tap menu
   2. Tap Settings, then Privacy
   3. Tap Factory data reset
   4. Tap Reset phone
   5. Enter the password if prompted, then select Erase everything to continue

If the HTC Salsa  is frozen, do a hard reset by way of button combination.

   1. If the device is frozen,turn the phone's power off.  remove the battery out and reinsert it in back again
   2. Press and Hold the Volume Down button
   3. Press and hold the Power button until the device turns on
   4. A menu will then appear that let you choose for Fastbook, Recovery, Clear Storage, and Simlock
   5. Select Clear Storage by pressing the Volume Down button
   6. Press and then release the Power button
   7. Then confirm, press Volume Up for YES and press Volume Down for NO

Once the the wipe completes, the phone will reboot to its factory default state settings. All data stored including third-party applications has been deleted from the Salsa . You need to reinstall third-party application again.

HTC ChaCha Hard Reset, Wipe and Format to Factory Settings

This is the step by step procedures how to hard reset the HTC ChaCha to clear all data and restore it back to its original factory fresh default settings.Warning:  The result of this procedure will delete all data stored  from the HTC Salsa. The data stored on the microSD memory card  may or may not be deleted . We advice to back up all of important personal data before proceeding.

HTC ChaCha Factory Reset through Menu Settings
   1. From the main home screen, select menu
   2. Select Settings, then Privacy
   3. Select Factory data reset
   4. Select Reset phone
   5. Enter the password if prompted, then select Erase everything to continue

If the HTC ChaCha is frozen, do a hard reset by way of button combination.

   1. If the device is frozen,turn the phone's power off.  remove the battery out and reinsert it in back again
   2. Press and Hold the Volume Down button
   3. Press and hold the Power button until the device turns on
   4. A menu will then appear that let you choose for Fastbook, Recovery, Clear Storage, and Simlock
   5. Select Clear Storage by pressing the Volume Down button
   6. Press and then release the Power button
   7. Then confirm, press Volume Up for YES and press Volume Down for NO

Once the the wipe completes, the phone will reboot to its factory default state settings. All data stored including third-party applications has been deleted from the HTC ChaCha. You need to reinstall third-party application again.

LG Optimus 3D P920 Hard reset

This is a step by step instruction on how to Hard reset the LG Optimus 3D P920. If you want to return it to its factory settings again.

Please note that the result of this procedure will delete all data yoy previously installed on your handset.  This process may or may not delete data stored on the microSD card. Just do have a back up copy of all your important data on the device before proceeding.

This  is only advisable if the you'd experience a hang or frozen problem in your device when using or opening any applications installed.

LG Optimus 3D P920- Factory reset through menu settings:

  1. From the main HOME screen, tap MENU

   2. Tap SETTINGS, then PRIVACY

   3. Tap FACTORY DATA RESET

   4. Tap RESET PHONE

   5. When Password is prompted, enter it. Then


If the problem still persists, or if the phone is frozen, you may then try to hard reset the

LG Optimus Me P350 through button combination.


  1. If your LG Optimus 3D P920 is frozen, turn the Power OFF,  pull out the battery  and reinsert it back again.

   2. Hold the Home and Volume Down button

   3. Press and hold the Power button until the device turns on

   4. Follow the on-screen instructions on how to reset your LG Optimus 3D P920


Wait until the process finish. Once the wipe is complete, the LG Optimus 3D P920 phone will then reboot to its factory fresh default state settings. All data you previously installed on it already been deleted.

LG Optimus Me P350 Hard Reset

This is a step by step instruction on how to Hard reset the LG Optimus Me P350 also known as LG Pecan, If you want to return it to its factory settings again.
Please note that the result of this procedure will delete all data yoy previously installed on your handset.  This process may or may not delete data stored on the microSD card. Just do have a back up copy of all your important data on the device before proceeding.
This  is only advisable if the you'd experience a hang or frozen problem in your device when using or opening any applications installed.

LG Optimus Me P350 - Factory reset through menu settings:

  1. From the main HOME screen, tap MENU
   2. Tap SETTINGS, then PRIVACY
   3. Tap FACTORY DATA RESET
   4. Tap RESET PHONE
   5. When Password is prompted, enter it. Then

If the problem still persists, or if the phone is frozen, you may then try to hard reset the
LG Optimus Me P350 through button combination.
  
  1. If your LG Optimus Me P350 is frozen, turn the Power OFF,  pull out the battery  and reinsert it back again.
   2. Hold the Home and Volume Down button
   3. Press and hold the Power button until the device turns on
   4. Follow the on-screen instructions on how to reset your LG Optimus Me P350

Wait until the process finish. Once the wipe is complete, the LG Optimus Me P350 phone will then reboot to its factory fresh default state settings. All data you previously installed on it already been deleted.

Sony Ericsson Spiro w100i,w100a Hardware Problem Repair Guides and Manual

This repair guide covers the mechanical or hardware problem areas on Sony Ericsson Spiro
W100i and Wi00a such as the following:


SE Spiro w100i,w100a Power On and OFF problem
SE Spiro w100i,w100a Restart or auto shut off randomly problem
SE Spiro w100i,w100a LCD Screen Display problem
SE Spiro w100i,w100a LCD backlight LED problem
SE Spiro w100i,w100a Numeric keys, Navigation keys and Volume Keypad problem
SE Spiro w100i,w100a Microphone Problem
SE Spiro w100i,w100a Ear Speaker problem
SE Spiro w100i,w100a Buzzer Speaker problem
SE Spiro w100i,w100a Camera problem
SE Spiro w100i,w100a FM radio problem
SE Spiro w100i,wi00a Bluetooth problem
SE Spiro w100i,w100a Insert Sim card or Sim not detected problem
SE Spiro w100i,w100a Not Charging problem
SE Spiro w100i,w100a network Signal problem
SE Spiro w100i,w100a Handsfree problem

Download the Sony Ericsson Spiro W100i and W100a Service Manual
http://uploading.com/files/bbamdcc4/W100_Spiro_service.rar/