How to Hard Reset Samsung Galaxy Y S5360 reformat to factory default settings

Here's the procedure on how to restore back or hard reset the Samsung Galaxy Y S5360 to it's original factory default settings. This process is useful if you experience some lag, frozen, hang or unresponsive issues. This is not advisable on some part, for it will wipe and delete all data stored from your Samsung Galaxy Y, so just ensure to make a back-up copy of all of the important files you had on your device.

The most often method when the device hangs or just it frozen, is to remove the battery out after a couple of seconds and then putting it back again. To reset your device just dial this code *2767*3855#, this will reset your phone automatically once rebooted.

But sometimes the code may not always useful specially when your Samsung Galaxy Y is frozen and become unresponsive or in other sever hang problem like it just hangs on welcome screen logo. To fix it, just then again remove the battery out, then put it back again. Don't power it ON yet, just press and hold the Volume Up, Center button and Power button at the same time. A menu will then appear that let choose with an option. Just use the volume button to toggle and select the wipe data/factory reset, that will then reset your Galaxy Y to it's factory default settings.

Repair Guide: How to fix iphone 3G/3Gs backlight not working after wet damaged

This is DIY guide to fix a not working backlight on iPhone 3GS.
But proceed with precautions for this guide are meant for technicians only.
We are not responsible if anything happens to your device.

This guide will help you fix your iPhone 3G or 3Gs if it's accidentally been dropped into a water or geeting wet damaged. and then result to LCD backlight failure. There are any other solution for this but this, but this one really works and mostly a less time consuming effort.

Okay let's take a look of what happens to your iPhone, you accidenatlly drops in water or in any liquid and you turn it apart try to dry up with in few hours. And then assembled it back again and then powered it up, you can still hear some tones but it turns out a dark screen display without illuminating on the LCD. So, okay the problem might be an LCD.

Now, before you attempt to purchase a new LCD on, let's tackle up for awhile in this solution for maybe it will help you fix your iPhone's LCD backlight problem. Try this solution first before moving on finding on later solution if it doesn't help or work for you. Because if this will not work you will need to have another hard work to do, for this one is the most basic part which I did in most of my repairs before I attempt to change the LCD and so-called backlight coil replacement.

You'll only need a soldering skills in this area, you any find some tutorials in youtube etc. Basically it's a fix for the 3gs LCD, this solution shows you a detailed guide how to wire a bypass from the LCD connector.


 Download see the solution here.

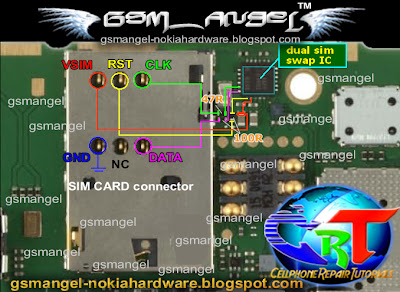
Nokia C2-03 Fix Insert Sim Card Problem (SIM IC jumper Ways)

Here's the solution that may useful to fix the Nokia C2-03 if it does not detect any sim card inserted to it and it only shows "Insert SIM card" even if the sim card is already inserted.
This solution guide shows the connection of both two sim card slot of the Nokia C2-03 since it is built as a dual SIM swapping device. Thank's to GsmAngel for sharing this solution to us.

This solution covers for the side slot SIM card.
nokia c2-03 sim card IC jumper ways
And this one covers for the SIM card beneath the battery.
nokia c2-03 sim card IC jumper ways
You can follow the step by step troubleshooting procedure here at GsmAngel Solution.

Samsung Wave 2 S8530: How to Flash and Upgrade to Bada 2.0.1 [S8530XPKH1] firmware

Another Bada 2.0 firmware leaked for Samsung Wave 2 S8530 lately and this one which has a build number S8530XPKH1 CSC_S8530_Open_Europe_Common_OXA_KH1. A Europe firmware version for Samsung Wave 2 with build date August 2011. Many users recently has been using this firmware since it will add great improvements and enhancement for their phones. Although, this is only a leaked version it will still works and they love it.

The procedure below will show you how they successfully upgrade their Samsung Wave to the BADA 2.0 firmware. All you need to have is to download the following files before proceeding:

DISCLAIMER: I am not responsible for your phone if it gets bricked. Proceed at your risk! 


USB driver
Multiloader v 5.65

BADA 2.0 firmware from samfirmware.com links
S8530XPKH1 http://hotfile.com/dl/126043817/738c80f/S8530XPKH1.rar.html
Password is samfirmware.com

Flashing Bada 2.0 OS on Samsung Wave II S8530


You have to flash it as a "full-firmware" and with bootfiles.
Also, keep in mind that you have to set debug level to low and then you can fully use your bada 2.0 beta version. Even turning the phone off will not crash it.
Just type *#33284*# and debug level to LOW, on BADA 2.0 flashed phone and enjoy the Difference.

Troubleshooting hints if errors may happens while flashing.
Only one thing important, when I flash, after the Bootfiles, i've got a serial port error. So I just unplug/plug my Wave to another USB port, and restart Multiloader (et restart the flash without the bootfiles, because they've already been flashed).


- shutdown while in progress => reason is battery low level => charge it then try once more

- phone can't go pass sim loading in booting progress => may be by CSC was not config, may be by flashing improper (ex. choosing wrong file wrong places)

- Try to reboot without sim card inside the phone. If pass, keyin code *#5239870*# , select line 2 , keyin pass *#27236#* and select proper csc region for ur phone.

- Some times phone can be login without sim (while with sim impos.bl) if wrong csc.

How to Flash Install/Upgrade Samsung Wave S8500 to Bada 2.0.1 [S8500XPKG5 S8500XPKG6 S8500XPKG7] firmware

 Here's  a step by step guide on how to manually install and upgrade Samsung Wave S8500 to Bada 2.0.1 OS.
This firmware is only a leaked version and bugs may exists but it still works and make use of Samsung Wave with better performance and enhancements. There are three versions of BADA 2.0 leaked just builded around July 2011, the S8500XPKG5, S8500XPKG6 and S8500XPKG7. These firmwares were for Europe versions of Samsung Wave only

DISCLAIMER: I am not responsible for your phone if it gets bricked. Proceed at your risk! 

Pre-requisite: 
Download the following files: (credits to samfirmware.com for the links)
USB driver
Multiloader v 5.65

BADA 2.0 firmwares

S8500XPKG5 - CSC_OXAKG5
S8500XPKG6 - CSC_OXAKG6
S8500XPKG7 - CSC_OXAKG7
The pass is samfirmware.com

How to flash and install: Here's a video guide from Ionaras13.


You have to flash it as a "full-firmware" and with bootfiles.
Also, keep in mind that you have to set debug level to low and then you can fully use your bada 2.0 beta version. Even turning the phone off will not crash it.
Just type *#33284*# and debug level to LOW, on BADA 2.0 flashed phone and enjoy the Difference.

Troubleshooting hints if errors may happens while flashing.
Only one thing important, when I flash, after the Bootfiles, i've got a serial port error. So I just unplug/plug my Wave to another USB port, and restart Multiloader (et restart the flash without the bootfiles, because they've already been flashed).


- shutdown while in progress => reason is battery low level => charge it then try once more

- phone can't go pass sim loading in booting progress => may be by CSC was not config, may be by flashing improper (ex. choosing wrong file wrong places)

- Try to reboot without sim card inside the phone. If pass, keyin code *#5239870*# , select line 2 , keyin pass *#27236#* and select proper csc region for ur phone.

- Some times phone can be login without sim (while with sim impos.bl) if wrong csc.

Solution: How to fix Blackberry Bold 9700 white screen problem

Here's a step by step guide and a solution to fix Blackberry bold 9700 white screen problem, many users called it a White Screen of Death(WSOD. This solution may help if having a problem issue like below.

blacberry bold 9700 white screen display
The Blackberry Bold 9700 showing a bright white screen display
Here's what your Blackberry Situation that may possibly fix this solution:
The phone hasn't been anywhere close to water and the moisture stickers are intact. Can still hear tones from incoming call or text messages.
Other than the display screen the phone is fully operational. Dm sees it perfectly, You can still do a blind-call out and receive calls. Only problem is i can only see a bright white screen.

Many sites has been suggesting a solution such as this: Battery pull, wipe, reinstall 4.6, reinstall 5, backup and restore files, clean install, battery left out for 24 hours and installed a new battery but it doesn't fix the problem.

Now, heres' a solution on how to fix a a Blackberry Bold 9700 with white screen problem.
1. Reassemble the Blackberry bold 9700, only do it unless the warranty period has already expired.
 Now, locate the highlighted components as shown on the image. These are the display filters. Works as electrostatic discharge (ESD) and electromagnetic Interference (EMI) filters, and once being damaged it will cause and result to a white screen, sometimes being garbled or saturated screen display.
balack berry bold 9700 display filter IC
Blackberry Bold Display Filters Components

Check those components and have it replaced, you may find these parts from any old Blackberry phone PCB board that are already junked. Just like the one below that taken apart from the damaged Blackberry 9100 PCB board.

Then in place it to your Blackberry bold 9700 display filters. Try replacing one by one then power it again to check, just repeat until all four filters being replace and get the screen display fix.
That's it! all credits goes to Rievax_08 and GSM Solido for the repair tricks. Happy fixing hope this helps.

Nokia C2-00 Schematic Diagram, Service Manual and Repair Guide

Here's the long awaited and hardly to find Nokia C2-00 schematic diagram we spotted somewhere over on another forum. You may use this in troubleshooting hardware related problem on Nokia C2-00 like the following hardware problems:
Nokia C2-00 Schematic Diagram

Not Charging problem - the C2-00 does not charge if the charger is plug in.
Display problem - shows abnormal displays on LCD screen like, blank or white screen, garbled etc.
Illuminating LED light light problem -  No back light LED on the LCD and shows a dark screen and no keypad LED problem.
No network Signal problem - shows a poor data signal, dropping or no signal reception at all.
Keypad problem- Some of the numeric or all of it is not working or functioning.
Audio problem - earpiece, microphone, ringer speaker, headset audio or sound problem.
USER interface problem - Insert sim card error, Memory card not detected, USB not detected problem.

Those are few things that might this schematic diagram is useful in fixing Nokia C2-00 hardware problems if occurred.

C2-00_RM-704_service_schematics_v1.0
Download link: http://www.megaupload.com/?d=E3DJ8FPQ
1.31 MB

Motorola DROID X2 Daytona (VERIZON) Hard Reset Guide

Motorola DROID X2 (also called Motorola Daytona) Hard Reset to Factory Default Settings.
In this guide we show you how to hard reset the Motorola DROID X2 with step by step instructions.

Precautions: Performing hard reset process will delete or wipe all data from the. We highly recommend to have a back up copy of all your important files stored on the device.

Motorola DROID X2 Factory/Soft Reset:

On the main Home Screen,
->select MENU
->select SETTINGS-> PRIVACY
->select FACTORY DATA RESET
->select RESET PHONE
->Enter the password
->select ERASE EVERYTHING


If the Motorola DROID X2 is frozen: this may sometimes occurs when running multiple applications and the device become unresponsive, you may fix this by rebooting the device or removing the battery for a while. But if the problem still persist you may need to full factory reset the device. 

Motorola DROID X2 Hard Reset through button combination for sever freezing problem., this will prompt you into recovery mode.

1. Turn the power off or remove the battery and reinsert it back again after a couple of seconds.
2. Press and hold the POWER+CAMERA buttons at the same time
3. Release the Camera button when prompted
4. Press and hold the Volume Down key
5. It will show A yellow exclamation display
6. Select the Wipe data/factory reset (Alt + W) option

Wait 'til the phone completely reboots. That's it...

HTC Sensation 4G (T-Mobile USA) Hard Reset to Factory Default Settings

Here's a step by step instructions on how to hard reset the HTC Sensation 4G.

Precautions: Performing hard reset process will delete or wipe all data from the. We highly recommend to have a back up copy of all your important files stored on the device.
HTC Sensation 4G (T-Mobile USA) Hard Reset Guide
HTC Sensation 4G Factory/Soft Reset:

On the main Home Screen,
->select MENU
->select SETTINGS-> PRIVACY
->select FACTORY DATA RESET
->select RESET PHONE
->Enter the password
->select ERASE EVERYTHING

If the HTC Sensation 4G is frozen: Reboot or restart the phone and do a hard reset through button combination, this will turn the device into recovery mode.

   1. Turn the power off. , remove the battery out and reinsert it back again
   2. Hold the Volume Down and Power Button together
   3. A menu will then show up such as Fastbook, Recovery, Clear Storage, and Simlock
   4. Select Clear Storage by pressing the Volume Down button
   5. Press and release the Power button
   6. Select: Volume Up for YES and Volume Down for NO
- Wait 'till the phone reboot.

Once the wipe process completes, the HTC Sensation 4G will return to its original factory fresh state default settings. All data including third-party applications will be deleted from the HTC Sensation 4G.So you may need to re-install it back again.

Sprint Motorola XPRT Hard Reset Procedure

Here's the the steps and procedure on how to hard reset the Motorola XPRT (Sprint) with Android OS, v2.2 (Froyo) packed with 1 GHz ARM Cortex-A8 processor, PowerVR SGX530 GPU, TI OMAP3620-1000  chipset.
motorola Xprt hard reset guide picture
This solution may help fix abnormal errors on device such as hang or frozen.
Just make sure to have a back up copy of all important data on the device before proceeding for this process will result to delete and wipe all data installed from the  Motorola XPRT .

Motorola XPRT Factory Reset through Menu Settings:

From the main HOME SCREEN 
->select MENU
->select SETTINGS 
->select PRIVACY
->select FACTORY DATA RESET
->select RESET PHONE
->Enter PASSWORD if prompted
->select ERASE EVERYTHING

 Motorola XPRT Hard reset through button combination, this will prompt you into recovery mode.
this may help if the Motorola XPRT is frozen,hang or unresponsive.

   1. Turn the power off or remove the battery and reinsert it back again after a couple of seconds.
   2. Press and hold the POWER+CAMERA buttons at the same time
   3. Release the Camera button when prompted
   4. Press and hold the Volume Down key
   5. It will show A yellow exclamation
   6. Select the Wipe data/factory reset (Alt + W) option

That's it...

Sony Ericsson Xperia X10 Schematic Diagram Service Manual

Here's the Sony Ericsson Xperia X10 Schematic and Disassembly manual. After a year since of its released date we spotted on the net the download links of the file.
General 2G Network GSM 850 / 900 / 1800 / 1900
3G Network HSDPA 900 / 1700 / 2100
HSDPA 850 / 1900 / 2100 / 800 - X10a for Americas
Announced 2009, November
Status Released 2010, March
Size Dimensions 119 x 63 x 13 mm
Weight 135 g
Display Type TFT capacitive touchscreen, 65K colors
Size 480 x 854 pixels, 4.0 inches
- Scratch-resistant surface
- Accelerometer sensor for auto-rotate
- Proximity sensor for auto turn-off
- Timescape/Mediascape UI This repair manual includes the following files listed below:

Sony Ericsson Xperia X10 Service manual/Schematic Diagram
Disassembly and Reassembly Manual, Product Specification, Electrical parts & Parts list PCB board layout and Schematic diagram.
This may help on Sony Ericsson Xperia X10 Repair and Troubleshooting for the following problems like:

* LCD Display problem - Abnormal Display
* Touch Screen Problem - Touch Screen Not Working
* Power ON problem- Power On does not work
* Initial Failure problem - Hang, frozen and restart
* Not Charging Problem - Abnormal charging
* Sim Card problem - insert sim card error, sim card not detected or recognize
* Micophone Problem - No voice call sound transmit
* Speaker problem - buzzer speaker malfunction
* Bluetooth and WiFi problem -Bluetooth and Wifi operation failures
* Camera problem - Camera Function not working
* GSM network signal problem - No Signal on GSM network
* HSDPA network signal problem - No signal on WCDMA network

Sony Ericsson Xperia X10 service manuals, assembly - disassembly instructions, troubleshooting guide and schematics downloads

http://www.megaupload.com/?d=F3RMJLMK

LG Phoenix Hard Reset Procedure

Step by step instructions on how to hard reset the LG Phoenix.

Please note that all data will be deleted from the LG Phoenix as a result of this procedure. This process may or may not delete data stored on the microSD card. We recommend backing up all of your personal data before proceeding.

This is how to factory reset the LG Phoenix to clear all data and restore its original factory default settings.

Factory Data Reset on Menu Settings:

   1. From Home screen, select menu
   2. Select Settings, then Privacy
   3. Select Factory data reset
   4. Select Reset phone
   5. Enter the password if prompted, then select erase everything

If the LG Phoenix is frozen, Try to do a hard reset through button combination:

   1. Shut the power OFF or pull the battery out and reinsert it again
   2. Press and hold the Power button and Volume Down button until the device turns on
   4. A menu like Fastbook, Recovery, Clear Storage, and Simlock appears.
   5. Just select Clear Storage by pressing the Volume Down button
   6. Then Press and release the Power button
   7. Confirm: Volume Up for YES and Volume Down for NO

That's it! just wait 'till the phone completely reboots.
Once the wipe is complete, the LG Phoenix will then return back to its factory fresh state settings.

LG Thrive Hard Reset Instruction

This is how to factory reset the LG Thrive to clear all data and restore its original factory defualt settings.

Please note: the result of this procedure will delete all data stored  from the LG Thrive.  This process may or may not delete data stored on the microSD card. We highly recommend to have a back up copy all of your personal data before proceeding.

 Step by step instructions on how to hard reset the LG Thrive.

Factory Data Reset on Menu Settings:

   1. From Home screen, select menu
   2. Select Settings, then Privacy
   3. Select Factory data reset
   4. Select Reset phone
   5. Enter the password if prompted, then select erase evrything

If the LG Thrive is frozen, Try to do a hard reset through button combination:

   1. Shut the power OFF or pull the battery out and reinsert it again
   2. Press and hold the Power button and Volume Down button until the device turns on
   4. A menu like Fastbook, Recovery, Clear Storage, and Simlock appears.
   5. Just select Clear Storage by pressing the Volume Down button
   6. Then Press and release the Power button
   7. Confirm: Volume Up for YES and Volume Down for NO

That's it! just wait 'till the phone completely reboots.
Once the wipe is complete, the LG Thrive will then return back to its factory fresh state settings.

Samsung DROID Charge Hard Reset

Step by step instructions on how to hard reset the Samsung DROID Charge.
Also known as Samsung SCH-i520, Samsung Inspiration, Samsung 4G LTE, Samsung Stealth V


Please Note: This process will delete or wipe all data from the Samsung DROID Charge. We advise to have a back up copy of all your important files stored on the device.

Factory Data Reset procedures:

   1. On the main home screen, tap menu
   2. Select Settings, then Privacy
   3. Select Factory data reset
   4. Select Reset phone
   5. Enter the password if prompted, then select Erase everything.

If your Samsung DROID Charge is frozen: Reboot or restart the phone.

   1. Turn the power off. , take the battery out and reinsert it back again
   2. Hold the Volume Down and Power Button
   3. A menu will then show up such as Fastbook, Recovery, Clear Storage, and Simlock
   4. Select Clear Storage by pressing the Volume Down button
   5. Press and release the Power button
   6. Select: Volume Up for YES and Volume Down for NO

Wait 'till the phone reboot, once the wipe process completes, the Samsung DROID Charge will return to its original factory fresh state default settings.
All data including third-party applications will be deleted from the Samsung DROID Charge.So you may need to re-install it back again. 

Samsung Galaxy Tab 30 Pin Dock Connector Pinout

Here's the pinout configuration of theSamsung Galaxy Tab from left to right solder pins of the dock connector.
Image courtesy of  Droidangel.com

This is the technical info of Samsung Galaxy Tab Pinouts for digital and analog I/O on the 30 pin dock connector.

1 Gnd P
2 Gnd P
3 USB_DP_CON I/O
4 USB_DM_CON I/O
5 IF_CON_SENSE I
6 V_ACCESSORY_5.0V P
7 V_BUS_1 P
8 V_BUS_1 P
9 VOUT_CHARGER P
10 VOUT_CHARGER P
11 no connection
12 no connection
13 ACCESSORY_ID / USB_ID I
14 ACCESSORY_INT I
15 Gnd P
16 Gnd P
17 MHL_DP I/O
18 MHL_DM I/O
19 MHL_ID I
20 IF_RXD I
21 IF_TXD O
22 no connection?
23 AP_TV_OUT O
24 REMOTE_SENSE I
25 no connection
26 no connection
27 EAR_L_CRADLE O
28 EAR_R_CRADLE O
29 3.5_INT_TEST I
30 Gnd P

Samsung Galaxy S LCD Screen Display Problem Hardware Solution

The solution below covers for Samsung Galaxy S I9000 with display problem cause by water or wet damaged.
This may only works if already tried installing or replacing the whole LCD screen module and calibrating the device ROM  but nothing happens.

This is the phones history before the LCD screen display goes wrong: "accidentally dropped in the toilet bowl" by the user. The phone still powers ON but the LCD display is empty or blank but still can hear tones.

Action taken:
1. Disassemble the phone then clean it by using a liquid cleaner and dries up.
2. Tried replacing or using another LCD screen, but still no luck.
3. Visually check the LCD pin connector then re-solder it.
4. Replace the Display filter IC's. Problem solved.
  See pictures below: The pink encircled components are display filters, if damaged will result to LCD screen display problem of Samsung Galaxy S I9000.
Samsung Galaxy S LCD  Screen Display Problem Solution picture

We have replace it all, but we only found out that only one chip display filter is faulty or damaged. Hope this helps and serve as a little bit information!

Blackberry bold 9700 Earpiece Speaker Problem Repair Solution

Here's a a solution how to fix Blackberry Bold 9700 earpiece problem or no sounds can be heard when making a call conversations. This solution may help especially when already tried replacing the said earpiece speaker but still there is no sounds or abnormal sounds can be heard on it.

Just refer to the solution below and locate the highlighted components. Then visually check it, do a re-hot, re-solder or replacement when necessary.

Blackberry bold 9700 Earpiece Speaker Problem Repair guide
The highlighted components are the filter components for the earpiece speaker, if it become faulty it will result  an audio signal interruption through the ear speaker of the Blackberry Bold 9700 .

Kyocera M9300 ECHO Hard Reset to Original Factory Settings

These are the steps and procedures on how to hard reset the Kyocera M9300 ECHO  with Android OS, v2.2 (Froyo), 1GHz Scorpion processor, Qualcomm QSD 8650 Snapdragon.
Kyocera echo hard reset

Please note: Just make a back up copy of all your personal data before proceeding because the result of this process will delete all data you previously installed on the device. Performing a factory reset is only advisable if you want to return back the phone to its original factory default settings and also fix some abnormal functions of the device.

This is a simple guide if you want to return the device to its original factory settings again.

Kyocera M9300 ECHO Factory data reset:

1. On the main home screen, select menu
2. Select Settings, then Privacy
3. Select Factory data reset
4. Select Reset phone
5. Enter the password if prompted, then confirm by selecting Erase everything

Kyocera M9300 ECHO Hard reset, this may help if the phone experience some hang or frozen on some applications:

1. Turn the phone's power off. Take the battery out from the device, wait a couple of seconds and reinsert it back again.
2. Now, Hold the Volume Down button
3. Then press and hold the Power button until the device turns on
4. A menu will show up like: Fastbook, Recovery, Clear Storage, and Simlock
5. Just select Clear Storage by pressing the Volume Down button
6. Then press and release the Power button
7. Select Volume Up if YES and Volume Down for NO

Once the reset process is complete, the phone will then reboot to its factory fresh state settings.
Any data including third-party applications previously stored from the Kyocera M9300 ECHO already wiped or deleted.

T-Mobile T839 Sidekick 4G Hard Reset to Factory Default Settings

These are the steps and procedures on how to hard reset the T-Mobile T839 Sidekick 4G  with Android OS, v2.2 (Froyo), 1 GHz ARM Cortex-A8 processor, PowerVR SGX540, GPU, Hummingbird chipset.
This is a simple guide if you want to return the device to its original factory settings again.
Please note: Just make a back up copy of all your personal data before proceeding because the result of this process will delete all data you previously installed on the device. Performing a factory reset is only advisable if you want to return back the phone to its original factory default settings and also fix some abnormal functions of the device.


T-Mobile Sidekick 4G Factory data reset:

1. On the main home screen, select menu
2. Select Settings, then Privacy
3. Select Factory data reset
4. Select Reset phone
5. Enter the password if prompted, then confirm by selecting Erase everything

T-Mobile  Sidekick 4G Hard reset, this may help if the phone experience some hang or frozen on some applications:

1. Turn the phone's power off. Take the battery out from the device, wait a couple of seconds and reinsert it back again.
2. Now, Hold the Volume Down button
3. Then press and hold the Power button until the device turns on
4. A menu will show up like: Fastbook, Recovery, Clear Storage, and Simlock
5. Just select Clear Storage by pressing the Volume Down button
6. Then press and release the Power button
7. Select Volume Up if YES and Volume Down for NO

Once the reset process is complete, the phone will then reboot to its factory fresh state settings.
Any data including third-party applications previously stored from the HTC Sensation already wiped or deleted.

HTC Sensation Hard Reset to Factory Dafault Settings

These are the steps and procedures on how to hard reset HTC Sensation with Android OS, v2.3 (Gingerbread) 1.2 GHz dual-core processor, Adreno 220 GPU Qualcomm MSM 8260 Snapdragon. This phone is also known as HTC Sensation 4G in AT&T USA network and also has a humored name as HTC Pyramid.
This is a simple guide  if you want to return the device to its original factory settings again.


Don't forget to have a back up copy  all of your personal data before proceeding because the result of this process will delete all data you previously installed on the device. Performing a factory reset is only advisable if you want to return back the phone to its original factory default settings and also fix some abnormal functions of the device.


HTC Sensation Factory data reset:

1. On the main home screen, select menu
2. Select Settings, then Privacy
3. Select Factory data reset
4. Select Reset phone
5. Enter the password if prompted, then confirm by selecting Erase everything

HTC Sensation Hard reset, this may help if the phone experience some hang or frozen on some applications:

1. Turn the phone's power off. Take the battery out from the device, wait a couple of seconds and reinsert it back again.
2. Now, Hold the Volume Down button
3. Then press and hold the Power button until the device turns on
4. A menu will show up like: Fastbook, Recovery, Clear Storage, and Simlock
5. Just select Clear Storage by pressing the Volume Down button
6. Then press and release the Power button
7. Select Volume Up if YES and Volume Down for NO

Once the reset process is complete, the phone will then reboot to its factory fresh state settings.

Any data including third-party applications previously stored from the HTC Sensation already wiped or deleted.

HTC EVO 3D (Sprint) Hard Reset to Factory Default Setiings

Here's a steps and procedures on how to hard reset HTC EVO 3D CDMA with Android OS, v2.3 (Gingerbread) 1.2 GHz dual-core processor, Adreno 220 GPU. This is a simple guide  if you want to return it to its factory settings again.

We recommend to have a back up copy  all of your personal data before proceeding because the result of this process will delete all data you previously installed on the device. Performing a factory reset is only advisable if you want to return back the phone to its original factory default settings and also fix some abnormal functions of the device.


HTC EVO 3D Factory data reset:

1. On the main home screen, select menu
2. Select Settings, then Privacy
3. Select Factory data reset
4. Select Reset phone
5. Enter the password if prompted, then confirm by selecting Erase everything

HTC EVO 3D Hard reset, this may help if the phone experience some hang or frozen on some applications:

1. Turn the phone's power off. Take the battery out from the device, wait a couple of seconds and reinsert it back again.
2. Now, Hold the Volume Down button
3. Then press and hold the Power button until the device turns on
4. A menu will show up like: Fastbook, Recovery, Clear Storage, and Simlock
5. Just select Clear Storage by pressing the Volume Down button
6. Then press and release the Power button
7. Select Volume Up if YES and Volume Down for NO

Once the reset process is complete, the phone will then reboot to its factory fresh state settings.

Any data including third-party applications previously stored from the HTC EVO 3D already wiped or deleted.

Samsung I6220 Star TV Service manual , Schematic and Disassembly

This is the service manual the Samsung I6220 Star TV  Repair Guides and Troubleshooting for the following problems like:


* Software Downloading - Firmware programming
* Touch Screen Problem - Touch Screen Not Working
* Not Charging Problem - Abnormal charging
* Power ON problem- Power On does not work
* Initial Failure problem - Hang, frozen and restart
* LCD Display problem - Abnormal Display
* Micophone Problem - No voice call sound transmit
* Camera problem - Camera Function not working
* Speaker problem - buzzer speaker malfunction
* Sim Card problem - insert sim card error, sim card not detected or recognize
* Bluetooth and WiFi problem -Bluetooth and Wifi operation failures
* GSM network signal problem - No Signal on GSM network
* WCDMA network signal problem - No signal on WCDMA network

The documents also attached are Disassembly and Reassembly Manual, Product Specification, Exploded View, Electrical parts, Parts list PCB board layout , Block and Schematic diagram.

Samsung I6220 Star TV  service manuals, assembly - disassembly instructions, troubleshooting guide and schematics. Check the download links below:
Note: we only spotted this links, we do not host or upload the files.
Download Link 1
Download Link 2

Samsung I5800 Galaxy 3 service manual, schematic and disassembly

We spotted this Samsung GT-I5800 Galaxy  3 Service manual on the net. The phone was Released 2010, July and runs with Android OS, v2.1 (Eclair), upgradable to v2.2. The documents attached are Disassembly and Reassembly Manual, Product Specification, Exploded View, Electrical parts & Parts list PCB board layout , Block and Schematic diagram.

This service manual also includes the Samsung Galaxy  3 I5800 Repair Guides and Troubleshooting for the following problems like:
* Touch Screen Problem - Touch Screen Not Working
* Not Charging Problem - Abnormal charging
* Power ON problem- Power On does not work
* Initial Failure problem - Hang, frozen and restart
* LCD Display problem - Abnormal Display
* Micophone Problem - No voice call sound transmit
* Camera problem - Camera Function not working
* Speaker problem - buzzer speaker malfunction
* Sim Card problem - insert sim card error, sim card not detected or recognize
* Bluetooth and WiFi problem -Bluetooth and Wifi operation failures
* GSM network signal problem - No Signal on GSM network
* WCDMA network signal problem - No signal on WCDMA network

Samsung GT-I5800 Galaxy 3 service manuals, assembly - disassembly instructions, troubleshooting guide and schematics. Check the download links below:

Download Link 1
Download Link 2
Download Link 3

Samsung I8700 Omnia 7 service manual, schematic and disassembly

Here's the Samsung GT-I8700 Omnia 7 with Microsoft Windows Phone 7 OS Service manual, Disassembly and Reassembly Manual, Product Specification, Exploded View, Electrical parts & Parts list PCB board layout and Schematic diagram we spotted on the web.

This service also includes the Samsung I8700 Omnia 7 Repair Guides and Troubleshooting for the following problems like:
* Power ON problem- Power On does not work
* Initial Failure problem - Hang, frozen and restart
* LCD Display problem - Abnormal Display
* Touch Screen Problem - Touch Screen Not Working
* Not Charging Problem - Abnormal charging
* Micophone Problem - No voice call sound transmit
* Camera problem - Camera Function not working
* Speaker problem - buzzer speaker malfunction
* Sim Card problem - insert sim card error, sim card not detected or recognize
* Bluetooth and WiFi problem -Bluetooth and Wifi operation failures
* WCDMA network signal problem - No signal on WCDMA network
* GSM network signal problem - No Signal on GSM network


Samsung GT-i8700 Omnia7 service manuals, assembly - disassembly instructions, troubleshooting guide and schematics download links: Note we did not host or upload the said document so check it out by yourself.

Download Link 1
Download Link 2
Download Link 3
Download Link 4

Samsung I7500 Galaxy Service Manual & Schematic Diagram

 Here's the Samsung Galaxy GT-I7500 with Android OS, v1.5 (Cupcake) Service manual, Disassembly and Reassembly Manual, Product Specification, Exploded View, Electrical parts & Parts list  PCB board layout and Schematic diagram.

This also includes the Samsung I7500 Galaxy  Repair Guides and Troubleshooting for the following problems like:
* Power ON problem- Power On does not work
* Initial Failure problem - Hang, frozen and restart
* LCD Display problem - Abnormal Display
* Touch Screen Problem - Touch Screen Not Working
* Not Charging Problem - Abnormal charging
* Sim Card problem - insert sim card error, sim card not detected or recognize
* Micophone Problem - No voice call sound transmit
* Speaker problem - buzzer speaker malfunction
* Bluetooth and WiFi problem -Bluetooth and Wifi operation failures
* Camera problem - Camera Function not working
* GSM network signal problem - No Signal on GSM network
* WCDMA network signal problem - No signal on WCDMA network

Samsung GT-I7500 service manuals, assembly - disassembly instructions, troubleshooting guide and schematics downloads


Download Link 1
Download Link 2
Download Link 3
Download Link 4
Download Link 5
Download Link 6

Samsung I5500 Galaxy 5 Service manual/Schematic Diagram

 Here's the Samsung Galaxy 5 I5500 Service manual download links we spotted on the net, Also known as Samsung i5500 Corby Smartphone, Samsung Galaxy Europa, Samsung Galaxy 550 with Android OS version, v2.1 (Eclair), upgradable to v2.2. This repair manual includes the following files listed below:

Samsung I5500 Galaxy 5  Service manual/Schematic Diagram

Disassembly and Reassembly Manual, Product Specification, Exploded View, Electrical parts & Parts list  PCB board layout and Schematic diagram.
This also includes the Samsung I5500 Galaxy 5 Repair Guides and Troubleshooting for the following problems like:

* LCD Display problem - Abnormal Display
* Touch Screen Problem - Touch Screen Not Working
* Power ON problem- Power On does not work
* Initial Failure problem - Hang, frozen and restart
* Not Charging Problem - Abnormal charging
* Sim Card problem - insert sim card error, sim card not detected or recognize
* Micophone Problem - No voice call sound transmit
* Speaker problem - buzzer speaker malfunction
* Bluetooth and WiFi problem -Bluetooth and Wifi operation failures
* Camera problem - Camera Function not working
* GSM network signal problem - No Signal on GSM network
* WCDMA network signal problem - No signal on WCDMA network

Samsung I5500 Galaxy 5 / GT-I5500B / Corby Smartphone / Galaxy 550 service manuals, assembly - disassembly instructions, troubleshooting guide and schematics downloads

Download Link 1
Download Link 2
Download Link 3
Download Link 4

Samsung Galaxy Tab GT-P1000 Service manual/Schematic Diagram

Here's the Samsung Galaxy Tab GT-P1000 Service manual we spotted on the net, this manual includes the following files listed below:

Disassembly and Reassembly Manual, Product Specification, Exploded View, Electrical parts & Parts list  PCB board layout and Schematic diagram.
This also includes the Samsung P1000 Galaxy tab Repair Guides and Troubleshooting for the following problems like:

* Power ON problem- Power On does not work
* Initial Failure problem - Hang, frozen and restart
* Not Charging Problem - Abnormal charging
* Sim Card problem - insert sim card error, sim card not detected or recognize
* Micophone Problem - No voice call sound transmit
* Speaker problem - buzzer speaker malfunction
* Bluetooth and WiFi problem -Bluetooth and Wifi operation failures
* LCD Display problem - Abnormal Display
* Touch Screen Problem - Touch Screen Not Working
* Camera problem - Camera Function not working
* GSM network signal problem - No Signal on GSM network
* WCDMA network signal problem - No signal on WCDMA network

Samsung GTP1000 Galaxy Tab service manuals, assembly - disassembly instructions, troubleshooting guide and schematics downloads

Download link 1
Download link 2

Nokia N8 Manual Format, Reset to Factory Settings Instruction

This is how to factory reset the Nokia N8 and restores the device to its original factory default settings.

Factory reset:
    1. From Main Menu go to Settings
    2. Select Phone
    3. Select Phone Management
    4. Select Factory Settings then Delete Data and Restore


Hard Reset

Note: This will delete all your applications installed and you may need to install it back again after the hard reset has been made. This is only advisable if you have a screen problem errors like, hang or frozen problems. So proceed with precautions.

    * Turn off the phone.
    * Press and hold the following Button keys:
          o Volume Down button
          o Camera button
          o Menu button
Press the Power button until the phone vibrates....

Just wait until the phone reboot and the reset process completes.

Nokia X2-01 Manual Format and Factory Reset Code


If you ever wanted your Nokia X2-01 to restore back  to its original factory default settings, this reset code  will help you..
Note: This is only advisable if you experience some error problems regarding applications installed on the phone and you want to wipe it out. .


Nokia X2-01 Soft Reset by code
This will return back your X2-01 to its factory setting :

1. Dial or Key in *#7780#
2. Press Ok/Yes

This soft reset mode will not delete/harm your important data or applications, it simply restore the .ini files of the Nokia X2-01 ROM

Hard Reset Nokia X2-01:

1. Dial or Key in *#7370#
2. Press OK/Yes

Another method you can try it if both method mentioned above will not work.
The method is:
Press and hold down  *+3+Yes button right after your phone is turned on.

Google Nexus S 4G Hard Reset - restore to factory settings procedure

 This is the way how to hard reset the Google Nexus S 4G also known as Samsung SPH-D720. This will restore the phone data to original factory default settings.

We recommend to have a back up copy of all your personal data first, before proceeding. The result of this procedure will delete all data from the Google Nexus S 4G.

This procedures are only advisable if the phone experience several error problem like frozen or unresponsive.

samsung google nexus S 4G hard reset guide
Factory reset through menu settings:

   1. On the main home screen, select menu
   2. Tap Settings, then Privacy
   3. Select Factory data reset
   4. Select Reset phone
   5. Enter the password if prompted, then confirm by tapping  Erase everything

Google Nexus S 4G Hard Reset through Button keys combination: 

   1. Turn the power off. Take  the battery out from the phone and reinsert it back again
   2. Hold the Volume Down button
   3. Press and release the Power button
   4. You are now presented with a menu that allows for Fastbook, Recovery, Clear Storage, and Simlock
   5. Select Clear Storage by pressing the Volume Down button
   6. Press and release the Power button
   7. Confirm by selecting: Volume Up for YES and Volume Down for NO

Once the wipe is complete, the phone will reboot to its factory fresh state.

LG G2X Hard Reset

Here's a simple procedure on how to hard reset the LG G2x to wipe and clear all data and restore its original settings.

LG
Precautions: The result of this process may delete all the data stored on the device.. We recommend to have a back up all of your personal data before proceeding. Performing a hard reset is only advisable if the phone experience several error problems like frozen or unresponsive. 

To reset the phone safely, you may try this.

   1. From the home screen, select Menu
   2. Select Settings,
   3. Select Privacy
   4. Select Factory data reset
   5. Select Reset phone
   6. Enter the password if prompted,
   7. Then confirm by selecting Erase everything

Wait 'till the process completes....

To hard reset the LG G2x, this may help if the phone is frozen but this will delete all data you previously installed on the device.
   1. Turn OFF the  phone's power then take  the battery out from the device and reinsert it back again.
   2. Hold the Volume Down button
   3. Briefly press and hold the Power button until the phone turns on
   4. A menu appears: Fastbook, Recovery, Clear Storage, and Simlock
   5. Just select Clear Storage by pressing the Volume Down button
   6. Press and release the Power button
   7. Select Volume Up for YES and Volume Down for NO
Wait 'till the phone completely reboot..

Remember that all data including 3rd-party applications you installed on your LG G2X already wipe out. You need to re-install it back again. Enjoy!

Nokia X3-01 Hardware Problem Repair Guides

This all Nokia X3-01 hardware failure problem repair guides. The picture guides samples is shown below and the instructions and procedures is on the document that is available on the download link below.

nokia X3-01 hardware solution
nokia X3-01 earpiece speaker jumper ways solution
nokia X3-01 buzzer speaker jumper ways solution
nokia X3-01 camera problem solution
nokia X3-01 LCD display Light LED problem solution
nokia X3-01 LCD display problem solution
nokia X3-01 FM radio problem solution
nokia X3-01 Insert Sim card problem solution
nokia X3-01 keypad light problem solution
nokia X3-01 mic problem solution
nokia X3-01 T-flash memory problem solution

and more like: Bluetooth problem, No Network Signal  problem, charging problem and etc.

 Download the Nokia X3-01 Repair Guides
http://uploading.com/files/a7c7m9f3/.rar/

SonyEricsson W100i Spiro Memory card not detected problem solution

This is the Sony Ericsson Spiro W100 solution for unable to detect or recognize the memory card problem.
If this problem occurred due to wet damaged,  you may first clean the components showed on the solution below.
SE w100 spiro memory card problem repair guide picture
Then visually inspect if those components are not damaged, if found so, replace it according to their rated resistance values.

Samsung Omnia I900 Hardware Repair Guide and Service manual

This is the service manual for Samsung Omnia I900  for hardware problem failures such as the following below:


Samsung Omnia I900 Power problem
Samsung Omnia I900 Receiver speaker problem
Samsung Omnia I900 Buzzer Speaker problem
Samsung Omnia I900 MIC problem
Samsung Omnia I900 Keypad problem
Samsung Omnia I900 Sim card problem
Samsung Omnia I900 memory card problem
Samsung Omnia I900 Bluetooth problem
Samsung Omnia I900 No Network problem

Download Samsung Omnia I900  Repair Guide

Samsung C3303k Champ Mic, Microphone Problem, Modified Solution

This is another solution we spotted for Samsung Champ C3300k Not working microphone problem. This solution below is a modifying method on replacing the 5 pin digital microphone with the standard two pin microphone. This may help if you having hard time finding a new replacement microphone, but if you have a replacement spare just replace the microphone and disregard this solution.

The method is by using a 5K resistor to other mic terminal then soldered  both the positive and ground pins of the standard microphone... We've not already tried it, so just try it by yourself.

Samsung Galaxy S 4G Disassembly/Disassemble Guide

This is only a teardown but also works as disassembly guide if you want to removed  and replace the battery, LCD screen replacement, cleaning or fixing something etc. 

Here's the step by step guide on how to disassemble the Samsung Galaxy S 4G. You may need an opening tools like Philips screwdriver #00, plastic opening tools, heat gun and your burnt fingers.


Samsung Galaxy S 4G Teardown

Samsung Galaxy S 4G PCB Board Components Layout

Here's the Samsung Galaxy S 4G PCB board which shows the components and IC's mounted or used in the circuit. The major IC's used were labeled as a reference and familiarization of the entire PCB board layout.

Samsung Galaxy S 4G front PCB Motherboard IC Components:
     Maxim MAX8987 DC Power Management
     Samsung KB100L00WM-A453 4Gb (512 MB) of mobile DRAM which contains a 1 GHz Intrinsity Processor in a package-on-package configuration, according to the fine folks at
     ST Ericsson's THOR M5730 HSPA+ Thin Modem
     ST Ericsson GNS7560 Single Chip GPS Solution
     Bosch Sensortec Accelerometer

View the high resolution version of this image.


Samsung Galaxy S 4G Back PCB Motherboard IC Components:


     Broadcom BCM4329 802.11n Wi-Fi, Bluetooth 2.1, and FM Tuner
     ST Ericsson RF5000 Radio Transceiver (part of THOR M570 chipset)
     Wolfson Microelectronics WM8994 Audio CODEC
     Skyworks SKY77447 Load Insensitive Power Amplifier for WCDMA / HSDPA / HSUPA / HSPA+ Band II
     Skyworks SKY77544 TX-RX Front End Module
     Skyworks SKY77460 WCDMA/HSPA+ Power Amplifier

View the high resolution version of this image.

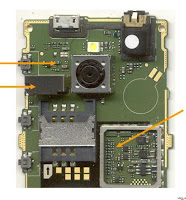
The Samsung Galaxy S 4G compact front and rear  camera assembly flex board.


It uses a NEC MC10170 Image Processor cleverly mounted right to its ribbon cable.


The Samsung Galaxy S 4G headphone jack, earpiece speaker, and proximity/ambient light sensors Flex cable.


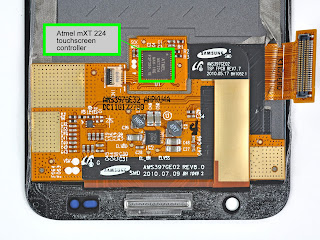
Back of the display assembly mounted the Atmel mXT 224 touchscreen controller.


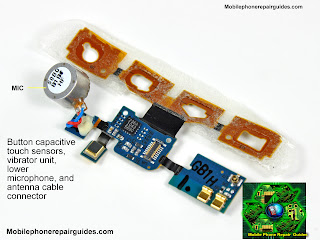
The removed button capacitive touch sensors, vibrator unit, lower microphone, and antenna cable connector mounted on the same flex assembly.

There you have it the labeled Samsung Galaxy S 4G PCB Board, That's all folks!