Nokia E5 LCD Screen Display LED Light Problem Solution

Here's the Nokia E5 solution for not working LCD screen display backlight LED problem that result to a black or dark screen display problem. The following repair guide shows the connection of the LCD displays or LCD panel backlight LED.

This may help for quick and easy repair for not working LCD backlight problem. Just ensure that the LCD is not damaged like broken or cracked, for you may need to buy a new LCD display for that matter. Just refer to the solution below if after ensuring that the LCD is still working and only the light won't glow up.

Nokia X2-01 Diassembly/Dismantle Guide

This following manual is a repair manual of Nokia X2-01 mobile phone as a reference for technician or even the cellphone owner to perform proper troubleshoot, service, repair, assembly and disassembly of the cellphone.
Nokia X2-01 repair manual
The contents of the following service manual are including step by step instruction how to properly and safely disassemble, list of parts, required equipment, required software, the whole logic PCB board, power supply, camera, LCD screen display interface module, keypad and backlight LED illumination, keypad interface, silicone rubber keypad and the keypad membrane etc.
Download Nokia X2-01 Diassembly/Dismantle Guide

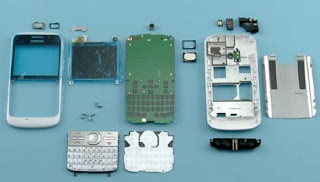
Nokia E5 Disassembly/Dismantle/Disassemble Guide

If you are looking for a guide on how to dismantle the Nokia E5, you can download it here. This guide is a complete instruction on how to safely dismantle the Nokia E5. This may help if you want to replace a broken or cracked LCD screen display, the silicone rubber keypads and the keypad membrane. Or if you want to clean or repair the phone if some problems occurred like earpiece speaker problem, microphone problem, buzzer problem, not charging problem, headset problem etc.
nokia disassembly repair manual
Note: Disassembling the device will void its warranty, so make sure that you will do this at your own risk.
Download Nokia E5 Disassembly Guide

Nokia C7 Reset Code, format and hard reset procedures

Important: To proceed to reset, the battery must be full and the
mobile device connected to the charger. If during the course of reset,
the mobile stop receiving electricity it can ruin the internal flash
memory of the mobile device and stop function.


Nokia C7-00 reset code
There is one more combination number which can be used for the all Symbian phones. The combination of the numbers of the *#7370# and also the *#7780# can be used for the Hard reset option. This is only used for the Symbian phones and not for any of the phones. The code may or may not full proof but it has yielded better results in many of the Symbian phones and should also work for the C7.

Code to reset the Nokia C7-00
1.- Basic Reset or Soft Reset for nokia C7-00

This option restores the .ini files from the ROM.
Does not erase data (photos, videos, documents) or applications from
a third party. Key Code *# 7780 # (click this combination of keys on the
keyboard in the mobile)
2.- Total Reset or Hard Reset for nokia C7-00

This option restores the original operating system from the ROM.
Formats the C: partition and deletes all data including the memory
card. Key Code *#7370# (click this combination of keys on the keyboard
in the mobile)


How to reset nokia C7-00
The following procedure should be carried out for hard reset of the Nokia C7 phones:

   1. Simultaneously hold the home button, camera button and the volume button.
   2. After that with the same buttons you got to click the power on button until the phone vibrates.
   3. After the procedure is complete release the power on button while still holding the three buttons simultaneously and you got to wait till you hear the nokia sound.

This will hard reset your mobile phone and you got to wait till all the processes are carried out and it will take some time.

However hard resetting can cause you the lose of all the important data that you have in your phone. If you have got a virus related issue then you can try the various virus console that are available in the computers and also try the nokia system's virus console where you get to learn the different virus that can affect the Symbian phone.

If the above steps are not working for your phone then you can contact the Nokia care system support team which will provide you help with all the software related issues. You have an another option that you can contact the retailer regarding the issue and he will surely give you a better view as to how the hard reset can be done on your phone. The hard reset option takes some time so you have to wait until all the set processes are over as it deletes all the files that are present in it and also depends on phone as to how much efficiently it will work.

Nokia C7 Functional Key User's Manual

Here's the Nokia C7 functional key specification and users manual to navigate and use certain keys. This shows all the corresponding Nokia C7 keypad keys and button keys functions like the following:
Left mouse button, Right mouse button, Direction key, Volume Control buttons, Touch pad, the Numeric and QWERTY keyboard keys. 


This also includes, the location of other main functions of  Nokia C7 like, earphone jack, mic, camera, simcard and the receiver speaker, there yo have it, the Nokia C7 functional key .

Samsung X510 buzzer and earpiece speaker problem jumper ways solution

Here's another solution to fix Samsung X510 buzzer and earpiece speaker problems. The solution below provides the connection line paths of the speaker.

You may first check and or try to replace the speaker, then trace the connection line paths as shown on the solution below.
Samsung X510 buzzer and earpiece jumper ways
 If the said connection is open or cut, just check the highlighted components, and then managed to apply a jumper wire on it.

SAMSUNG G600 restart problem solution

Here's the SAMSUNG G600 solution for restart problem, or it often restarted when the sim card is inserted. This solution may help fix the problem if the after software or flashing the device does not solve the problem.
and or hard resetting the phone by dialing *2767*3855# to reset does not help either. You may then try this solution below.

samsung restart problem repair picture
Steps in hardware repair on SAMSUNG G600 restart problem.
Just remove the highlighted component. then mend or managed or establish a jumper wire.

SAMSUNG C160 / C160M insert sim card problem solution

Here's another working solution for SAMSUNG C160 / C160M insert sim card problem, tested and working solution. The phone's history is not wet or water damaged. It was just happened told by the user. The procedures is in below on how to fix the said insert sim card problem of  SAMSUNG C160.

Here's the photo of the device after being diagnosed.
And the solution is, remove the highlighted capacitor on the PCB board.
SAMSUNG C160 sim card jumper ways


Hope this will help to those who are looking for this solution, credits goes to Blckshp_09

T-mobile memory cards compatibilty

T-mobile memory cards used in each products. This are just some few units, but you can used it if you are looking for which and what type and size to buy for such phone device.

T-Mobile MDA Touch microSD 16GB
T-Mobile MDA Touch Plus microSD 16GB
T-Mobile Vario III microSD 16GB
T-Mobile Vario IV microSD 16GB
T-Mobile Wing microSD 16GB
T-Mobile AMEO miniSD 4GB
T-Mobile Ameo 16GB miniSD 16GB
T-Mobile G2 Touch microSD 16GB
T-Mobile Garminfone microSD 32GB
T-Mobile Pulse Mini microSD 16GB
T-Mobile myTouch 3G Fender Edition microSD 16GB

Sony Ericsson Phones Memory Cards Compatibility Lists

Here's a lists of Sony Ericsson mobile phones memory card used in some of each product. You can use this as a reference if your looking for a compatibility memory cards to such unit or device you have.

Sony Ericsson Aino microSD 32GB
Sony Ericsson C901 MS Micro M2 8GB
Sony Ericsson C901 GreenHeart MS Micro M2 8GB
Sony Ericsson Elm microSD 8GB
Sony Ericsson Jalou (Bijou) microSD 16GB
Sony Ericsson K850i (microSD) microSD 16GB
Sony Ericsson C510 MS Micro M2 8GB
Sony Ericsson C702 MS Micro M2 16GB
Sony Ericsson C902 MS Micro M2 16GB
Sony Ericsson C903 MS Micro M2 8GB
Sony Ericsson G700 MS Micro M2 16GB
Sony Ericsson G705 MS Micro M2 8GB
Sony Ericsson G900 MS Micro M2 16GB
Sony Ericsson J105 Naite microSD 8GB
Sony Ericsson K530i MS Micro M2 16GB
Sony Ericsson K550i MS Micro M2 16GB
Sony Ericsson K610i MS Micro M2 4GB
Sony Ericsson K660i MS Micro M2 8GB
Sony Ericsson K770i MS Micro M2 16GB
Sony Ericsson K800i MS Micro M2 16GB
Sony Ericsson K810i MS Micro M2 16GB
Sony Ericsson K850i (M2) MS Micro M2 16GB
Sony Ericsson M600i MS Micro M2 16GB
Sony Ericsson P1i MS Micro M2 16GB
Sony Ericsson S500i MS Micro M2 16GB
Sony Ericsson Satio (Idou) microSD 32GB
Sony Ericsson TM506 MS Micro M2 8GB
Sony Ericsson T650i MS Micro M2 16GB
Sony Ericsson T700 MS Micro M2 16GB
Sony Ericsson T707 MS Micro M2 16GB
Sony Ericsson T715 microSD 16GB
Sony Ericsson W200i MS Micro M2 4GB
Sony Ericsson W300i MS Micro M2 4GB
Sony Ericsson W302 MS Micro M2 16GB
Sony Ericsson W350 MS Micro M2 16GB
Sony Ericsson W380i MS Micro M2 16GB
Sony Ericsson W395 MS Micro M2 8GB
Sony Ericsson W508 MS Micro M2 16GB
Sony Ericsson W580i MS Micro M2 16GB
Sony Ericsson W595 MS Micro M2 16GB
Sony Ericsson W610i MS Micro M2 16GB
Sony Ericsson W660i MS Micro M2 16GB
Sony Ericsson W705 MS Micro M2 8GB
Sony Ericsson W710i MS Micro M2 16GB
Sony Ericsson W715 MS Micro M2 8GB
Sony Ericsson W760 MS Micro M2 8GB
Sony Ericsson W880i MS Micro M2 16GB
Sony Ericsson W890i MS Micro M2 16GB
Sony Ericsson W902 MS Micro M2 16GB
Sony Ericsson W910i MS Micro M2 16GB
Sony Ericsson W995 MS Micro M2 8GB
Sony Ericsson Z530i MS Micro M2 4GB
Sony Ericsson Z550i MS Micro M2 4GB
Sony Ericsson Z555i MS Micro M2 16GB
Sony Ericsson Z610i MS Micro M2 16GB
Sony Ericsson Z710i MS Micro M2 16GB
Sony Ericsson Z750a MS Micro M2 16GB
Sony Ericsson Z770i MS Micro M2 16GB
Sony Ericsson D750i MS Pro Duo 8GB
Sony Ericsson K750i MS Pro Duo 8GB
Sony Ericsson P990i MS Pro Duo 8GB
Sony Ericsson S312 MS Micro M2 4GB
Sony Ericsson W205 MS Micro M2 2GB
Sony Ericsson W800i MS Pro Duo 8GB
Sony Ericsson W810i MS Pro Duo 8GB
Sony Ericsson W850i MS Pro Duo 16GB
Sony Ericsson W900i MS Pro Duo 8GB
Sony Ericsson Yari microSD 16GB
Sony Ericsson XPERIA X2 microSD 16GB
Sony Ericsson Vivaz microSD 16GB
Sony Ericsson XPERIA X10 microSD 32GB
Sony Ericsson XPERIA X10 mini microSD 16GB
Sony Ericsson Elm microSD 8GB
Sony Ericsson Hazel microSD 16GB
Sony Ericsson Vivaz microSD 32GB
Sony Ericsson Vivaz pro microSD 16GB
Sony Ericsson Zylo microSD 16GB

Samsung Phones Memry Card Compatibility Lists

This is the list memory cards used of some Samsung mobile phones products. You can refer to this lists for a quickly find your Samsung phones memory card type and size.

Samsung SGH-A737 microSD 4GB
Samsung SGH-F200 microSD 4GB
Samsung SGH-F210 microSD 4GB
Samsung SGH-F400 microSD 16GB
Samsung SGH-F480 microSD 16GB
Samsung SGH-F700V microSD 4GB
Samsung SGH-G400 microSD 16GB
Samsung SGH-G800 microSD 4GB
Samsung SGH-G810 microSD 16GB
Samsung SGH-i200 microSD 16GB
Samsung SGH-I550 microSD 16GB
Samsung SGH-i617 (BlackJack II) microSD 16GB
Samsung SGH-i780 microSD 8GB
Samsung SGH-i8510 (Innov8) microSD 16GB
Samsung SGH-i900 (Omnia) microSD 16GB
Samsung SGH-L700 microSD 16GB
Samsung SGH-S7330 microSD 16GB
Samsung SGH-U800 (Soulb) microSD 16GB
Samsung SPH-M800 (Instinct) microSD 16GB
Samsung A887 Solstice microSD 16GB
Samsung T469 Gravity 2 microSD 16GB
Samsung C6112 microSD 8GB
Samsung B5722 microSD 8GB
Samsung A897 Mythic microSD 8GB
Samsung A797 Flight microSD 32GB
Samsung B3410 microSD 8GB
Samsung A886 Forever microSD 32GB
Samsung M5650 Lindy microSD 8GB
Samsung S5560 Marvel microSD 16GB
Samsung I5700 Galaxy Spica microSD 32GB
Samsung E1390 microSD 2GB
Samsung E2130 microSD 2GB
Samsung B7620 Giorgio Armani microSD 32GB
Samsung T939 Behold 2 microSD 16GB
Samsung Vodafone 360 H1 microSD 16GB
Samsung Vodafone 360 M1 microSD 16GB
Samsung B3210 CorbyTXT microSD 8GB
Samsung F480i microSD 16GB
Samsung B7330 OmniaPRO microSD 32GB
Samsung S5230W Star WiFi microSD 16GB
Samsung S3650 Corby microSD 8GB
Samsung B3310 microSD 8GB
Samsung C3212 microSD 8GB
Samsung S3100 microSD 8GB
Samsung A887 Solstice microSD 16GB
Samsung I6220 Star TV microSD 16GB
Samsung S3650W Corby microSD 8GB
Samsung S5620 Monte microSD 16GB
Samsung S5550 Shark 2 microSD 16GB
Samsung C3510 Genoa microSD 8GB
Samsung M5650 Lindy microSD 8GB
Samsung C6112 microSD 8GB
Samsung S7070 Diva microSD 8GB
Samsung S5150 Diva folder microSD 8GB
Samsung C5130 microSD 8GB
Samsung B5722 microSD 8GB
Samsung A897 Mythic microSD 8GB
Samsung A797 Flight microSD 32GB
Samsung S5560 Marvel microSD 32GB
Samsung B3410 microSD 8GB
Samsung A886 Forever microSD 32GB
Samsung S5560 Marvel microSD 16GB
Samsung I5700 Galaxy Spica microSD 32GB
Samsung E2130 microSD 2GB
Samsung B7620 Giorgio Armani microSD 32GB
Samsung T939 Behold 2 microSD 16GB
Samsung Vodafone 360 H1 microSD 16GB
Samsung M3710 Corby Beat microSD 16GB
Samsung S8500 Wave microSD 32GB
Samsung I9000 Galaxy S microSD 32GB
Samsung S3370 microSD 16GB
Samsung S3650W Corby microSD 8GB
Samsung T669 Gravity T microSD 16GB
Samsung T479 Gravity 3 microSD 16GB
Samsung Smiley microSD 16GB
Samsung Acclaim microSD 32GB
Samsung Intercept microSD 32GB
Samsung I5800 Galaxy 3 microSD 32GB
Samsung C3300K Champ microSD 8GB
Samsung M110S Galaxy S microSD 32GB

Blackberry , Palm Treo memory card Compatibility lists

Here's the lists of Blackberry mobile phones memory cards used in each model, you can refer to this lists to easily find which model are compatible to the type and the size of memory cards used.

Palm Centro microSD 4GB
Palm Treo 500 microSD 16GB
Palm Treo 680 SD 4GB


BlackBerry 8800 microSD 4GB
BlackBerry 8830 microSD 4GB
BlackBerry Bold 9700 microSD 16GB
BlackBerry Curve 8300 microSD 4GB
Blackberry Curve 8310 microSD 4GB
BlackBerry Curve 8330 microSD 16GB
BlackBerry Pearl 8100 microSD 8GB
BlackBerry Pearl 8110 microSD 16GB
BlackBerry Pearl 8130 microSD 16GB
BlackBerry Curve 8520 microSD 16GB
Blackberry Storm 9500 microSD 16GB
Blackberry Storm 9530 microSD 16GB
BlackBerry Storm2 9520 microSD 16GB
BlackBerry Curve 8520 microSD 32GB
BlackBerry Tour 9630 microSD 8GB
BlackBerry Curve 8900 microSD 16GB
BlackBerry Storm 9500 microSD 16GB
BlackBerry Pearl 3G 9105 microSD 32GB
BlackBerry Pearl 3G 9100 microSD 32GB

Nokia Cell phones Memory card compatibility lists

If you are need and looking for any compatibility memory cards on your Nokia phones. The lists below shows which and what models are compatible with each other, for it shows the size and type of memory card used in each unit.

Nokia 6620, 6681, 6670, 6680, 6630 MMC 2GB
Nokia 6600, 3650, 3660 MMC 1GB
Nokia 2690 microSD 8GB
Nokia 2710 Navigation Edition microSD 16GB
Nokia 2730 classic microSD 2GB
Nokia 3110 classic/Evolve 2GB
Nokia 3120 classic microSD 8GB
Nokia 3600 slide microSD 16GB
Nokia 3710 fold microSD 8GB
Nokia 3720 classic microSD 8GB
Nokia 5130 XpressMusic microSD 16GB
Nokia 5220 XpressMusic microSD 16GB
Nokia 5230 microSD 16GB
Nokia 5233 microSD 16GB
Nokia 5310 XpressMusic microSD 8GB
Nokia 5320 XpressMusic microSD 16GB
Nokia 5330 XpressMusic microSD 16GB
Nokia 5330 Mobile TV Edition microSD 16GB
Nokia 5530 XpressMusic microSD 16GB
Nokia 5610 XpressMusic microSD 8GB
Nokia 5630 XpressMusic microSD 16GB
Nokia 5700 XpressMusic microSD 8GB
Nokia 5730 XpressMusic microSD 16GB
Nokia 5800 XpressMusic microSD 16GB
Nokia 6110 Navigator microSD 16GB
Nokia 6120 classic microSD 8GB
Nokia 6210 Navigator microSD 16GB
Nokia 6216 classic microSD 8GB
Nokia 6267 microSD 4GB
Nokia 6220 classic microSD 16GB
Nokia 6290 microSD 4GB
Nokia 6233 microSD 2GB
Nokia 6300i microSD 16GB
Nokia 6303i classic microSD 8GB
Nokia 6350 microSD 16GB
Nokia 6500 slide microSD 4GB
Nokia 6550 microSD 16GB
Nokia 6555 microSD 4GB
Nokia 6555 (AT&T) microSD 4GB
Nokia 6600 fold microSD 16GB
Nokia 6600 slide microSD 16GB
Nokia 6600i slide microD 16GB
Nokia 6700 slide microSD 16GB
Nokia 6730 classic microSD 8GB
Nokia 6760 slide microSD 8GB
Nokia 6788 microSD 8GB
Nokia 6790 Surge microSD 8GB
Nokia 7020 microSD 16GB
Nokia 7230 microSD 16GB
Nokia 7500 microSD 4GB
Nokia 7310 Supernova microSD 16GB
Nokia C3 microSD 16GB
Nokia C5 microSD 16GB
Nokia C6 microSD 16GB
Nokia E51 microSD 16GB
Nokia E52 microSD 16GB
Nokia E55 microSD 16GB
Nokia E66 microSD 16GB
Nokia E71 microSD 16GB
Nokia E72 microSD 16GB
Nokia E75 microSD 16GB
Nokia E90 microSD 16GB
Nokia N70 MMC 2GB
Nokia N71 miniSD 2GB
Nokia N72 MMC 2GB
Nokia N73 miniSD 2GB
Nokia N75 microSD 16GB
Nokia N76 microSD 2GB
Nokia N77 microSD 2GB
Nokia N78 microSD 16GB
Nokia N79 microSD 8GB
Nokia N80 microSD 16GB
Nokia N81 microSD 16GB
Nokia N82 microSD 16GB
Nokia N85 microSD 16GB
Nokia N86 microSD 16GB
Nokia N90 MMC 2GB
Nokia N92 miniSD 2GB
Nokia N93 miniSD 2GB
Nokia N95 microSD 16GB
Nokia N96 microSD 16GB
Nokia N97 microSD 16GB
Nokia N97 mini microSD 16GB
Nokia N900 microSD 16GB
Nokia N810 (Internet Tablet) miniSD 16GB
Nokia Mural microSD 32GB
Nokia X10 microSD 16GB
Nokia X2 microSD 16GB

Motorola mobile phone memory card compatibility list

Here's some of Motorola phones memory card lists used in each Motorola phone products. You can refer to this lists to find which are compatible with each other.


Motorola A3000 microSD 32GB
Motorola A3100 microSD 32GB
Motorola Q9H microSD 16GB
Motorola Razr V9m (Verizon) microSD 4GB
Motorola RIZR Z6TV microSD 4GB
Motorola ROKR W5 microSD 2GB
Motorola ROKR W6 microSD 2GB
Motorola ROKR E8 microSD 2GB
Motorola ROKR E6 SD 2GB
Motorola ROKR Z6 microSD 1GB
Motorola ROKR E2/E1 SD 2GB
Motorola Q9c miniSD 16GB
Motorola DEXT MB220
Motorola MC55 microSD 8GB
Motorola MILESTONE microSD 32GB
Motorola Motocubo A45 microSD 32GB
Motorola Karma QA1 microSD 16GB
Motorola Tundra VA76r microSD 32GB
Motorola W7 Active Edition microSD 16GB
Motorola ZN300 microSD 32GB
Motorola QUENCH microSD 32GB
Motorola BACKFLIP 32GB
Motorola MT710 ZHILING microSD 32GB
Motorola XT720 MOTOROI microSD 32GB

LG phone memory card compatibility lists

This are some few list of LG phones microSD memory card used in each mobile phone product. You can use this lists if you are in trouble of finding which and what size to buy or use.

LG CU515 microSD 4GB
LG CU575 (Trax) microSD 4GB
LG CU720 (Shine) microSD 4GB
LG HB620T microSD 4GB
LG KC550 microSD 4GB
LG KF510 microSD 4GB
LG KF750 (Secret) microSD 16GB
LG KM380 microSD 16GB
LG KM500 microSD 16GB
LG KT610 microSD 16GB
LG Muziq microSD 4GB
LG VX10000 (Voyager) microSD 16GB
LG VX8550 (Chocolate 2) microSD 16GB
LG VX8560 (Chocolate 3) microSD 16GB
LG VX8700 microSD 4GB
LG VX8800 (Venus) microSD 16GB
LG VX9100 (enV2) microSD 16GB
LG VX9400 microSD 4GB
LG VX9700 (Dare) microSD 16GB
LG VX9900 (enV) microSD 4GB
LG GD580 Lollipop microSD 8GB
LG GD710 Shine II microSD 16GB
LG KM555E microSD 16GB
LG GD310 microSD 4GB
LG GD510 Pop microSD 16GB
LG BL20 New Chocolate microSD 16GB
LG BL40 New Chocolate microSD 32GB
LG SU420 Cafe microSD 16GB
LG GX500 microSD 16GB
LG GT950 Arena microSD 32GB
LG GT405 microSD 8GB
LG GS290 Cookie Fresh microSD 16GB
LG GS500 Cookie Plus microSD 8GB
LG GU292 microSD 16GB
LG GM360 Viewty Snap microSD 16GB
LG GT400 Viewty Smile microSD 16GB
LG SU420 Cafe microSD 16GB
LG KM570 Cookie Gig microSD 16GB

HTC Phones Memory Card Compatibility List

Here's a list of HTC phone microSD memory cards compatibility. This includes the size of corresponding memory cards used in every HTC mobile phones.


HTC 8925 Tilt microSD 16GB
HTC P4350 microSD 16GB
HTC S710 microSD 16GB
HTC S730 microSD 16GB
HTC Touch microSD 16GB
HTC Touch Dual microSD 16GB
HTC Touch Pro microSD 16GB
HTC TyTN II microSD 16GB
HTC P3600 miniSD 4GB
HTC X7500 (Advantage) miniSD 4GB
HTC X7510 (Advantage) miniSD 16GB
HTC P6300 SD 16GB
HTC Desire microSD 32GB
HTC HD mini microSD 16GB
HTC Legend microSD 16GB
HTC Google Nexus One microSD 32GB
HTC Smart microSD 16GB
HTC HD2 microSD 16GB
HTC Pure microSD 16GB
HTC Tattoo microSD 16GB
HTC Touch2 microSD 16GB
HTC Hero microSD 16GB
HTC Ozone microSD 16GB
HTC Wildfire microSD 16GB
HTC HD mini microSD 32GB
HTC Desire microSD 32GB
HTC Aria microSD 32GB

Samsung C3050 Hardware and Software Problem Repair Solution

If your Samsung C3050 mobile phone experience some problems and some of its functions doesn't work anymore, this solution below may possibly help fix the problem on your device.
This covers for the following troubleshooting or repair procedures  on Samsung C3050 such as:
Firmware downloading and software calibration - auto shut off or restart problem
 LCD display screens problem - how to replace a broken LCD screen or cracked LCD screen
samsung repair manuals and solution pictures
 keypads Problem
 Power On
 Insert Sim card
 Microphone
 Earpiece Receiver Speaker
 Buzzer Speaker
 No Network Signal problem
 Bluetooth
 FM radio

 This repair guides also includes on how to properly dismantle the C3050 Samsung mobile phones, circuit schematic and block diagrams and its parts lists.
Download Samsung C3050 repair manuals here.

Nokia C1-00 Not Charging Solution

This solution covers for Nokia C1-00 Charging problem such "charger no response" when the charger is being plug-in to the device. To fix this problem you may refer to the solution below for it shows which particular components needs to check or replace if found damaged or faulty.

nokia C1-00 Not charging  jumper ways repair picture

Repair hints on Nokia C1-00 Not Charging - charger no response problem:
1. Try to use another charger and replace the phones battery.
2. Check the charging pin connector for possible damaged.
3. Clean the charging pin connector PCB's terminal contact pads.
4. Check / replace the fuse and the chip diode.

For "Not Charging" showing on the display ,  try to flash the device firmware again. then do steps above.
If the problem still exist, there must a problem on the Charging or Power IC. reworking or replacing it might only fix your nokia c1-00 not charging problem.

Nokia 5230 MIC Problem Repair Solution

The following solution is for Nokia 5230 MIC(microphone) mouthpiece failure or not working problem. The solution below provides some simple steps on how to fix the the 5230 microphone problem.

Nokia 5230 mic problem jumper ways picture
Repair hints for Nokia 5230 Not working MIC microphone problem:
1. Try restore, the device firmware or flash update to the latest available version.
2. Replace the 5-pin digital microphone.
3. Check the VMIC supply voltage, if already replace but the problem still exists.
4. Check replace the resistors and capacitors.
5. Rework AVILMA IC, replace if necessary, then re-flash the phone again to its firmware version.

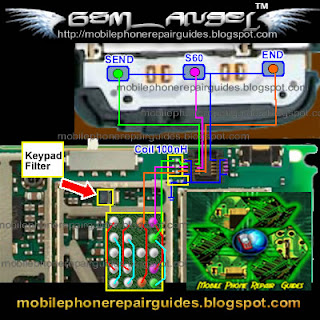
Nokia 5230 Send, Menu, End keypad key problem Solution

Here's a hardware repair solution for Nokia 5230 not working upper keypad keys such as the SEND,MENU and END keys problems.This solution provides another way on how to fix if the upper keypad keys don't work.

You may refer to the solution  and follow some step by step procedures below, as like the way how we fix the keypad problem on Nokia 5230 nuron.
 Nokia 5230 Send, Menu, End keys Jumper Solution
Repair hints for Nokia 5230 for not working SEND, MENU and END upper keys:
1. Try to reset, restore or flash update the device firmware to any latest firmware version using your flashing device.
2. Check the pin connector, clean it if necessary.
3. Check the keypad flex matrix for possible damaged, replace if necessary.
4. Check or replace the filter inductors, or coils.
5. Replace the Keypad Filter IC.
6. If the above procedure doesn't fix the problem. you may trace each of the keypad connection line paths down to the filter IC for possible, open circuit.
After that circuit above,  the keypad connection line paths goes through to the CPU, The CPU IC will be your next target of suspected components if all of the above solution doesn't fix your nokia 5230 keypad problem.

Nokia 5230 keypad Light Problem Jumper Solution

This solution covers for Nokia 5230 nuron with not working keypad light problem. The solution below shows the connection line paths of the keypad LED such as the SEND, MENU and END keypad light LED's.

Just refer to the given solution below and follow some step by step procedure on how to fix the problem.

5230 keypad backlight jumper repair picture
Repair hints for Nokia 5230 not working upper keypad light LED.
1. Try to flash update the device firmware first.
2. Check the upper key flex connector for possible damaged, replace if necessary.
3. Check or replace the keypad LED's.
4. Check the keypad pin connector, clean it if necessary.
4. Check the particular filter coil in each keypad LED's. replace if found damaged.

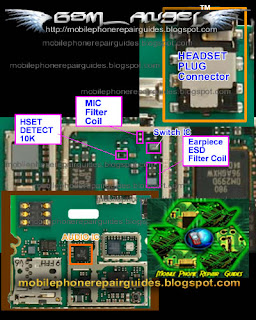
Nokia 5230 Headset MIC and Earpiece Problem Repair Solution

Here's the solution for  Nokia 5230 Nuron that deals with headset problem like, not working headset microphone and earpiece speaker, Earpiece device not detected when being plug-in or connected and also headset activated mode problem.

Refer the headset problem solution  and follow some repair guides below, on how to fix the problem.

Nokia 5230 Headset  Problem repair picture guide
Repair hints for Nokia 5230 headset problems:

Nokia 5230 Headset MIC not working:
1. Try to use another working headset.
2. Check the plug connector for possible damaged.
2. Check /replace the MIC filter coil.
4. Replace the audio IC.

Nokia 5230 Headset Earpiece not working:
1. Try to use another working headset.
2. Check the plug connector for possible damaged.
2. Check /replace the earpiece filter coil and chip.
4. Replace the audio IC.

Nokia 5230 headset device not detected or recognize:
1. Try to use another working headset.
2. Check the plug connector for possible damaged.
2. Check /replace the headset detect 10K resistor.
4. Restore /flash update the device firmware.

Nokia 5230 headset in activated mode, headset icon keep on showing on the display:
1. Try to flash update the device firmware to the latest available version.
2. Check, the headset connector for possible damaged.
3. Check /replace the headset detect 10K resistor and the capacitor. 
4. Check /replace the switching IC. 

How to Upgrade Huawei Ascend OS via PC or On-line

This procedure will Format or Hard Reset Huawei Ascend. You may also need to backup all the data as well as the downloaded apps before doing hard reset.

You can download the upgrade files on their Huawei website just check if its still available:
1). Download the upgrade file from
http://www.huaweidevice.com/worldwide/technicaIndex.do

2). Then Unzip the software on your PC to extract the upgrade package. The upgrade package has a folder structure (don't change the file structure nor renaming it). This folder is called “dload”.

3). Use the USB cable to connect your mobile phone to your PC

4). Copy the folder structure to the main directory (root directory) of your microSD card

5). After you have copied the file to the microSD card, disable the USB mass storage feature

6). While the phone is powered off, press the Volume up, End, and Power buttons at the same time. The upgrade interface will then appear

7). After upgrade success, remove the battery for 3 seconds, and then restart the phone. Wait for the system to start up and enter the idle state. Now the upgrade is complete.

Online Update, advisable only before Ascend got Frozen:

1). Go to ‘Settings’

2). Opt ‘About Phone’

3). Tap ‘Online Update

4). Make sure your SD card has enough bytes to your new updates version

Factory Data Reset Through Menu Settings:

1. On the ‘Settings’ screen, tap ‘Privacy’, then tap ‘Factory Data Reset.’
2. When prompted, select ‘Reset Phone’, and then select ‘Erase Everything’. The mobile phone resets the settings to the original factory settings, and then reboot.

How to reboot or do system restore Huawei Ascend or what codes or button to push?
If you are having trouble with your huawei ascend and want to do hard reset or format it back to its factory setting, you need a file or software that is called Huawei Ascends recovery rom. This program will help you to restore your Huawei Ascend to its default setting.
You can click here to download Huawei Ascend recovery rom.

Nokia 5230 Solution for Not Working Earpiece Speaker Problem

This covers for Nokia 5230 solution for Earpiece Speaker problem. The solution provides some simple repair hints and also shows the connection line paths of the receiver speaker for easy troubleshooting.

If encountered a try to fix the Nokia 5230 Earpiece speaker problem just follow some step by step instruction below.
Nokia 5230 earpiece speaker jumper ways
Repair hints on how to fix the Nokia 5230 Not Working Earpiece Speaker:
step 1. Check and try to replace the Receiver Speaker.
step 2. Clean the Earpiece Speaker terminal contact pads.
step 3. Check the filter coils and the ESD protection diodes, replace it if  already damaged.
step 5. Trace the connection of the each terminal contact pads down to the each filter coils where it is being connected.
step 6. If  all of the above procedures does not fix the problem. Try to flash update the device firmware to any latest file version.
step 7. In this level you may need to rework or replace the AVILMA IC and re-flash update the device firmware again.

Nokia 5230 Blank White, Blue Screen Display Problem Jumper Ways Solution

This solution covers for Nokia 5230 Nuron LCD display problem such as white screen, blank or black scree, blue screen, garbled or saturated screen displays.

The solution below shows the connection line paths of the LCD display circuit. You may then refer to that solution for further troubleshooting, but before that just follow some hints on how to fix the display problem as hereby indicated below.

Nokia 5230 Display Problem Jumper ways tracks picture
Repair hints on How to fix the  Nokia 5230 Display Problem:
step 1. First try to replace the LCD screen module, check and clean the LCD pin connector.
step 2. Try to flash update the device flash firmware to any latest available version.
step 3. Check the LCD supply voltages, also check the filter coil and capacitor, replace if found damaged.
step 4. Replace the Display EMI/ESD Filter IC.
step 5. Rework, replace the Display controller IC.
step 6. If you get into this level, you may need to rework or replace the RAPIDO IC and flash update the device again.

Nokia 5230 Display Light Problem Jumper Ways Solution

If encountered a display light problem of Nokia 5230 that shows a dark screen display, here we show you the connection line paths of the Display light circuit and prefered some simple instruction on how to fix it.
Refer to the solution and follow some simple step by step instruction below.
Nokia 5230 Display Light Jumper ways tracks
Repair hints for Nokia 5230 Dark Screen Display with not working LED light problem:
1. Try to replace the LCD module, to confirm if the LED light were still working or not.
    If the problem still exists follow the steps below.
2. Check the LCD pin connector for possible damaged, clean it, then replace if necessary.
3. Trace the two supply voltage that feeds from the resistors down to the pin connector.
4. Check also the connected resistors, replace if found damaged.
5. If the keypad LED also does not light up, te problem may possibly lies on faulty LED driver IC.
6. Check the inductor coil, and also read the 3.8 volts battery supply voltage.
7. If the voltage is okay and the inductor coil is still working,.. Replace the LED Driver IC.

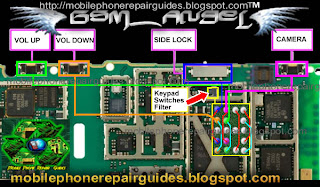
Nokia 5230 Volume Up, Volume Down Button Switch Jumper Ways Solution

Here's the jumper solution for Nokia 5230 Volume up and down button switch. This solution shows the connection line paths of the 5230 Volume control switches.

You may refer to the solution if encountered and try to fix a not working volume switch.
nokia 5230 Volume control switch jumper ways
The volume control switches is connected directly to the keypad filter IC, you may need to replace the keypad filter IC if the said volume switches is not working or responding.

Nokia 5230 Camera Button Switch Jumper Ways Solution

If you are looking for the solution for not working camera button switch  of Nokia 5230, this solution shows the connection line paths of it. This may also helpful for damaged or lifted camera switch solder pads.


nokia 5230 Camera switch jumper ways
Like the volume up and down switch, the camera switch is also connected to the keypad filter IC , so therefore you may need to replace the, the filter IC if the camera switch stop working or responding.

Nokia 5230 Nuron Charger Not Supported Problem Solution

This is another solution for Nokia 5230 with charger not supported problem. This solution shows the mostly main components that may result to charger not supported if being damaged.

To fix the problem, you may first try to use another working charger and replace the phones battery, if the problem still persists, locate the highlighted components on the PCB board, and then try to replace it.
nokia 5230 charger not supported repair picture
On the solution above shows the BTEMP (battery temperature) 47k resistor, that may need to replace if the device shows "charger not supported when the charger is plug-in or inserted.

Nokia 5230 Not Charging Problem Solution

This shows the Nokia 5230 solution for not charging problem such as "charger no response or shows no indication when the battery charger is inserted or plug-in". the solution below shows the connection line paths of the 5230 charging circuit which is useful in troubleshooting the not charging problem issues.

You may locate the highlighted components and do some test and check up procedures, then follow some some step by step instruction below.

Nokia 5230 Not Charging Problem Solution for Repair
Nokia 5230 charge jumper ways
Repair hints on Nokia 5230 Not charging problem:
1. Try to use another working charger and battery.
2. Check the charging pin connector for posibble damaged. Replace if found so.
3. Clean the charging pin connector contact pads and trace its connection down to the fuse and ground lines.
4. Check the fuse if already busted or blown out, check the diode if shorted, a shorted diode make the fuse blown up again.
5. Check, clean the battery terminals.
6. Rework the Betty IC, if the fuse, diode, and inductor coil is okay. Just replace if necessary.
That's it... 

Nokia 5230 Camera Hardware Operation Failure Problem Solution

This is a Nokia 5230 Nuron solution for not working camera or shows errors when the camera opened or used. This may help fixing the device after confirming or already flash, update or restore the flash firmware but nothing happens.

Here we show some hints on how to fix the Nokia 5230 with camera problem issues that can not be fix by software calibration. Just refer to the solution below and locate the highlighted components on the 5230 PCB board.
Nokia 5230 camera problem solution
Nokia 5230 Camera problem repair solution
Some step by step Repair hints for Nokia 5230 camera failure problem:
1. Remove the camera module, check and clean the camera slot for possible damaged and oxidation build up,
then in-place it back or try to replace with a new one. 
2. Check all the camera supply voltages, such VCAM 1.8V, 2.8V and 1.3V on the capacitors pointed. If this this voltages is missing check the battery supply voltage of 3.8V to each of those DC regulator IC's.
3. If the battery supply is okay, replace the regulator IC that has no supply voltage output reads.
4. If all the supply voltages and the camera module is confirmed okay, there is a possibility that the problem lies on camera controller IC.
5. Reheat, rework or replace the Camera IC if necessary.
That's it, hope this help..

Sony Ericsson Xperia ARC (Anzu/X12) Hard Reset

How to hard reset the Sony Ericsson Xperia ARC (Anzu/X12).

Here's the step by step instruction on how to Hard Reset the Sony Ericsson Xperia arc Also known as Sony Ericsson Anzu, Sony Ericsson X12, to restore its original factory default settings.
Note: Doing a hard reset is only applicable if your Sony Ericsson Xperia arc experiencing a hang-up, unresponsive or frozen when opening or using some application installed.
Just make a back copy of all your important data before poceeding.

Here's the following step by step instructions:
Sony Ericsson Xperia ARC (Anzu/X12) Hard Reset manual

Soft Reset- Factory Reset on Menu Settings

   1. From the main home screen, select Menu
   2. Select Settings, then Privacy
   3. Select Factory Data Reset
   4. Select Reset phone
   5. Just enter the Password if prompted, then confirm by selecting Erase Everything

If your Sony Ericsson Xperia arc  is frozen, hang-up or unresponsive,

   1. Turn it off, remove the battery out and reinsert it back again
   2. Hold the Home and Volume Down button
   3. Press and hold the Power button until it turns on again
   4. Just follow the on-screen procedures to reset the Sony Ericsson Xperia arc

Once the restoring process completes, the Sony Ericsson Xperia arc  will then reboot, and then it will restore back to its original default state setting again like when you bought it way back then.

Motorola SPICE XT300 hard reset procedures

How to hard reset  Motorola SPICE XT300.

Here's the step by step instruction on how to Hard Reset the  Motorola SPICE XT300, to format and restore its original factory default settings.

Note: Performing a hard reset is only advisable if your Motorola SPICE XT300 experiencing a hang-up, unresponsive, frozen etc. when opening or using some application installed.
This process will result to wipe and delete all data and application you installed on the device, just make a back copy first before you may proceed.

Here's the following procedures:

Soft reset or format from the menu settings:
   1. On main home screen, select Menu
Motorola SPICE XT300 hard reset manual
   2. Select Settings, then Privacy
   3. Select Factory Data Reset
   4. Select Reset phone
   5. Just enter the Password if prompted, then confirm by selecting Erase Everything

If the device hang-up, unresponsive or frozen, you may do a hard reset through button combination:
   1.  If your Motorola SPICE XT300 is frozen, Turn the power off., remove the battery out and put it back again.
   2. Then briefly press and hold the Power and Camera buttons
   3. When prompted message appers, release the Camera button
   4. Press and hold the Volume Down key
   5. Then it display a yellow exclamation mark
   6. Just select Factory Reset and press OK

Just wait until the reset process completed, the Motorola SPICE XT300 will then reboot.
And then it will restore back to its original factory default settings again. 

Motorola DROID BIONIC XT865 Hard Reset Procedures

How to, hard reset procedures on Motorola DROID BIONIC XT865.

Here's the step by step instruction on how to Hard Reset the  Motorola DROID BIONIC XT865, to format and restore its original factory default settings.

Note: Performing a hard reset is only advisable if your Motorola DROID BIONIC XT865 experiencing a hang-up, unresponsive, frozen etc. when opening or using some application installed.
This process will result to wipe and delete all data and application you installed on the device, just make a back copy first before you may proceed.
Motorola DROID BIONIC  XT865 manual

Here's the following procedures:

Soft reset or format from the menu settings:
   1. On main home screen, select Menu
   2. Select Settings, then Privacy
   3. Select Factory Data Reset
   4. Select Reset phone
   5. Just enter the Password if prompted, then confirm by selecting Erase Everything

If the device hang-up, unresponsive or frozen, you may do a hard reset through button combination:

   1.  If your Motorola DROID BIONIC XT865 is frozen, Turn the power off., remove the battery out and put it back again.
   2. Then briefly press and hold the Power and Camera buttons
   3. When prompted message appers, release the Camera button
   4. Press and hold the Volume Down key
   5. Then it display a yellow exclamation mark
   6. Just select Factory Reset and press OK

Just wait until the reset process completed, the Motorola DROID BIONIC XT865 will then reboot.
And then it will restore back to its original factory default settings again. 

Motorola ATRIX 4G MB860 hard reset procedures

Here's the step by step instruction on how to Hard Reset the  Motorola ATRIX 4G MB860, to format and restore its original factory default settings.

Note: Performing a hard reset is only advisable if your  Motorola ATRIX 4G MB860 experiencing a hang-up, unresponsive, frozen etc. when opening or using some application installed.
This process will result to wipe and delete all data and application you installed on the device, just make a back copy first before you may proceed.
Motorola ATRIX 4G  MB860 format hard reset manual

Here's the following procedures:

Soft reset or format from the menu settings:
   1. On main home screen, select Menu
   2. Select Settings, then Privacy
   3. Select Factory Data Reset
   4. Select Reset phone
   5. Just enter the Password if prompted, then confirm by selecting Erase Everything

If the device hang-up, unresponsive or frozen, you may do a hard reset through button combination:
   1.  If your Motorola ATRIX 4G MB860 is frozen, Turn the power off., remove the battery out and put it back again.
   2. Then briefly press and hold the Power and Camera buttons
   3. When prompted message appers, release the Camera button
   4. Press and hold the Volume Down key
   5. Then it display a yellow exclamation mark
   6. Just select Factory Reset and press OK

Just wait until the reset process completed, the Motorola ATRIX 4G MB860 will then reboot.
And then it will restore back to its original factory default settings.

Sprint LG Revolution Tegra 2 hard reset procedures

Here's the step by step instruction on how to Hard Reset the LG Revolution also known as LG Tegra 2, to restore its original factory default settings.
Note: Doing a hard reset is only applicable if your LG Revolution experiencing a hang-up, unresponsive or frozen when opening or using some application installed.

Here's the following procedures:
 LG Revolution Tegra 2 hard reset manual
Soft Reset- Factory Reset on Menu Settings

   1. From the main home screen, select Menu
   2. Select Settings, then Privacy
   3. Select Factory Data Reset
   4. Select Reset phone
   5. Just enter the Password if prompted, then confirm by selecting Erase Everything

If your LG Revolution  is frozen, hang-up or unresponsive,

   1. Turn it off, remove the battery out and reinsert it back again
   2. Hold the Home and Volume Down button
   3. Briefly press and hold the Power button until it turns on again
   4. Just follow the on-screen procedures to reset the LG Revolution

Once the reset process completes, the  LG Revolution  will then reboot, and then it will restore back to its original default state setting again like when you bought it way back then.

Huawei Ascend (MetroPCS/Sprint) Hard Reset Guide

Here's how to Factory hard reset the Huawei Ascend to its original factory default settings.
Just do a back up copy of your important data before proceeding, this process will delete all installed data on it.
Huawei Ascend hard reset manual
Here's simple thing how to hard reset the Huawei Ascend
   1. ON the main home screen, tap menu
   2. Tap Settings, then Privacy
   3. Tap Factory data reset
   4. Tap Reset phone
   5. Enter your password if prompted, then tap Erase everything
How to reset the Huawei Ascend using the buttons:

First remove battery for a few minutes and then put it back in.

Then at the same time hold the following:

volume up, call button and power button (hold until it vibrates)

When it asks for permissions select:

select wipe data/ factory to reset
Once the reset process is complete the Huawei Ascend will then reboot and it will restore back to its original factory defualt settings.

LG Optimus Q LU2300 hard reset Procedures

Here's the step by step instruction on how to Hard Reset the LG Optimus Q LU2300, to restore its original factory default settings.
Note: Performing a hard reset is only applicable if your LG Optimus Q LU2300 experiencing a hang-up, unresponsive or frozen when opening or using some application installed.

Here's the following procedures:
 Optimus Q LU2300  hard reset manual

LG Optimus Q LU2300 Soft Reset/Factory Reset on Menu Settings

   1. On main home screen, select Menu
   2. Select Settings, then Privacy
   3. Select Factory Data Reset
   4. Select Reset phone
   5. Just enter the Password if prompted, then confirm by selecting Erase Everything

If your LG Optimus Q LU2300 is frozen, hang-up or unresponsive,

   1. Turn it off, remove the battery out and reinsert it back again
   2. Hold the Home and Volume Down button
   3. Press and hold the Power button until it turns on again
   4. Just follow the on-screen procedures to reset the LG Optimus Q LU2300

Once the restoring process completes, the LG Optimus Q LU2300 will then reboot, and then it will restore back to its original default state setting again like when you bought it way back then.

LG Optimus Q C710 Aloha hard reset Procedures

Here's the step by step instruction on how to Hard Reset the LG Optimus Q C710, to restore its original factory default settings.
Note: Performing a hard reset is only applicable if your LG Optimus Q C710 experiencing a hang-up, unresponsive or frozen when opening or using some application installed.

Here's the following procedures:
LG Optimus Q C710 Aloha hard reset manual

LG Optimus Q C710 Soft Reset/Factory Reset on Menu Settings

   1. On main home screen, select Menu
   2. Select Settings, then Privacy
   3. Select Factory Data Reset
   4. Select Reset phone
   5. Just enter the Password if prompted, then confirm by selecting Erase Everything

If your LG Optimus Q C710 is frozen, hang-up or unresponsive,

   1. Turn it off, remove the battery out and reinsert it back again
   2. Hold the Home and Volume Down button
   3. Press and hold the Power button until it turns on again
   4. Just follow the on-screen procedures to reset the LG Optimus Q C710

Once the restoring process completes, the LG Optimus Q C710 will then reboot, and then it will restore back to its original default state setting again like the way when you bought it.

LG Optimus S (Sprint) hard reset procedures

Here's the step by step instruction on how to Hard Reset the LG Optimus S, to restore its original factory default settings.

Note: Performing a hard reset is only applicable if your LG Optimus S experiencing a hang-up, unresponsive or frozen when opening or using some application installed.

Here's the following procedures:
LG Optimus S Hard Reset Manual

LG Optimus S Soft Reset/Factory Reset on Menu Settings

   1. On main home screen, select Menu
   2. Select Settings, then Privacy
   3. Select Factory Data Reset
   4. Select Reset phone
   5. Just enter the Password if prompted, then confirm by selecting Erase Everything

If your LG Optimus S is frozen, hang-up or unresponsive,

   1. Turn it off, remove the battery out and reinsert it back again
   2. Hold the Home and Volume Down button
   3. Press and hold the Power button until it turns on again
   4. Just follow the on-screen procedures to reset the LG Optimus S

Once the restoring process completes, the LG Optimus S will then reboot, and then it will restore back to its original default state setting again like the way when you bought it.

LG Optimus T P509 Burgundy hard reset procedures

Here's the step by step instruction on how to Hard Reset the LG Optimus T P509 Burgundy, to restore its original factory default settings.
Note: Doing a hard reset is only applicable if your LG Optimus T P509 Burgundy experiencing a hang-up, unresponsive or frozen when opening or using some application installed.

LG Optimus T P509 Burgundy hard reset format
Here's the following procedures:
While you opening your LG Optimus T, dialing 3845#*500# to open the internal test & settings menu. Clicking on Factory Reset menu shows: 
  1. Format SD Card
  2. Factory Reset
  3. Delete User Data
Then confirmation message show something like "Are you sure?".

LG Optimus T P509 Burgundy Soft Reset/Factory Reset on Menu Settings

   1. On main home screen, select Menu
   2. Select Settings, then Privacy
   3. Select Factory Data Reset
   4. Select Reset phone
   5. Just enter the Password if prompted, then confirm by selecting Erase Everything

If your LG Optimus T P509 Burgundy  is frozen, hang-up or unresponsive,

   1. Turn it off, remove the battery out and reinsert it back again
   2. Hold the Home and Volume Down button
   3. Press and hold the Power button until it turns on again
   4. Just follow the on-screen procedures to reset the LG Optimus T P509 Burgundy

Once the restoring process completes, the LG Optimus T P509 Burgundy will then reboot, and then it will restore back to its original default state setting again like the way when you bought it.

LG Optimus U (US Cellular) hard reset procedures

Here's the step by step instruction on how to Hard Reset the LG Optimus U for US Cellular 2G and 3G network, to restore its original factory default settings.
Note: Doing a hard reset is only applicable if your LG Optimus U experiencing a hang-up, unresponsive or frozen when opening or using some application installed.
LG optimus U hard reset manual
Here's the following procedures:

LG Optimus U Soft Reset/Factory Reset on Menu Settings

   1. From the main home screen, select Menu
   2. Select Settings, then Privacy
   3. Select Factory Data Reset
   4. Select Reset phone
   5. Just enter the Password if prompted, then confirm by selecting Erase Everything

If your LG Optimus M  is frozen, hang-up or unresponsive,

   1. Turn it off, remove the battery out and reinsert it back again
   2. Hold the Home and Volume Down button
   3. Press and hold the Power button until it turns on again
   4. Just follow the on-screen procedures to reset the LG Optimus U

Once the restoring process completes, the LG Optimus U will then reboot, and then it will restore back to its original default state setting again like when you bought it way back then.

LG Optimus M MetroPCS hard reset procedures

Here's the step by step instruction on how to Hard Reset the LG Optimus M, to restore its original factory default settings.
Note: Doing a hard reset is only applicable if your LG Optimus M experiencing a hang-up, unresponsive or frozen when opening or using some application installed.

Here's the following procedures:

 Soft Reset- Factory Reset on Menu Settings
 LG Optimus M hard reset
   1. From the main home screen, select Menu
   2. Select Settings, then Privacy
   3. Select Factory Data Reset
   4. Select Reset phone
   5. Just enter the Password if prompted, then confirm by selecting Erase Everything

If your LG Optimus M  is frozen, hang-up or unresponsive,

   1. Turn it off, remove the battery out and reinsert it back again
   2. Hold the Home and Volume Down button
   3. Press and hold the Power button until it turns on again
   4. Just follow the on-screen procedures to reset the LG Optimus M

Once the restoring process completes, the  LG Optimus M  will then reboot, and then it will restore back to its original default state setting again like when you bought it way back then.

LG P990 Optimus Speed 2X hard reset procedures

Here's the step by step instruction on how to Hard Reset the LG Optimus P990 2X, to restore its original factory default settings.

Just follow this simple steps below:
LG Optimus 2x android phone hard reset

Soft Reset- Factory Reset on Menu Settings

   1. From the main home screen, tap menu
   2. Tap Settings, then Privacy
   3. Tap Factory data reset
   4. Tap Reset phone
   5. Enter your password if required, then tap Erase everything to confirm

If your LG Optimus P990 2X is frozen, hang-up or unresponsive,

   1. Turn it off, remove the battery out and reinsert it back again
   2. Press and Hold the Power button and Volume Down button together
   3. Just follow the on-screen procedures to reset the LG Optimus P990 2X

Button combination: Turn your LG Optimus Off then simultaneously hold
Power and Volume Down Button.
Once the restoring process completes, the  LG Optimus P990 2X will then reboot, and then it will restore back to its original default state setting again like when you bought it way back then.

HTC Merge hard reset procedure

Here's a simple a step by step procedure on how to hard reset the HTC Merge that clears and wipe all data and restore its original factory settings.
This process is only applicable when experiencing hang, unresponsive or frozen device when opening or using some application, that is because this process will deleted all data you installed or stored on the device, so make a back up copy first before you may proceed.

HTC merge hard reset
A simple instruction to soft or factory reset through menu settings.
   1. On main home screen, select menu
   2. select Settings, then Privacy
   3. select Factory Data Reset
   4. Select Reset Phone
   5. Enter the password then confirm by selecting Erase Everything

If the HTC Merge is  unresponsive, hang up or frozen. Try to hard reset through button combination.

   1. Shut the POWER OFF., take the BATTERY OUT and reinsert it back again after a few seconds.
   2. Hold the VOLUME DOWN BUTTON
   3. Press and hold the POWER BUTTON until the device turns on
   4. A menu will show that let you choose for Fastbook, Recovery, Clear Storage, and Simlock
   5. Just Select CLEAR STORAGE by pressing the VOLUME DOWN button
   6. Then briefly press and release the POWER BUTTON
   7. Then select to confirm: Volume Up for YES and Volume Down for NO

Wait until the device will then reboot. Once its wipe completed, all data you previously installed on HTC Merge  has been already wipe out or cleared. You may need to re-install it back again.

HTC Inspire 4G hard reset procedure

This is a step by step instruction on how to hard reset the HTC Inspire 4G to clear all data and restore its original factory settings.
This process is only applicable when experiencing hang, unresponsive or frozen device when opening or using some application, that is because this process will deleted all data you installed or stored on the device, so make a back up copy first before you may proceed.

HTC INSPIRE 4g hard reset manual
Factory or soft reset throuh menu settings.
   1. On main home screen, select menu
   2. Select Settings, then Privacy
   3. Select Factory Data Reset
   4. Select Reset Phone
   5. Enter the Password then confirm by selecting Erase Everything

If the device is Frozen, Hang or unresponsive.

   1. Shut the POWER OFF., take the BATTERY OUT and reinsert it back again after a few seconds.
   2. Hold the VOLUME DOWN BUTTON
   3. Press and hold the POWER BUTTON until the device turns on
   4. A menu will show that let you choose for Fastbook, Recovery, Clear Storage, and Simlock
   5. Just Select CLEAR STORAGE by pressing the VOLUME DOWN button
   6. Then briefly press and release the POWER BUTTON
   7. Then select to confirm: Volume Up for YES and Volume Down for NO

Then wait until the device will then reboot. Once its completed, all data you previously installed on HTC Inspire 4G  has been already wipe out or cleared. You may need to re-install it back again.

HTC EVO 4G shift (Sprint ) Hard Reset Procedures

Here's a step by step instructions on how to hard reset the HTC EVO 4G Shift .
to reset and clear all data and restore its original factory settings

Doing a hard reset may only advisable if experiencing unresponsive, hang or frozen device.
This process may delete all data stored or installed on the device, you may do a back all important data installed on it, before proceeding.
 HTC EVO 4g hard reset manual
Factory Soft Reset through Menu Settings

   1. On the main Home Screen, select MENU
   2. Select SETTINGS, then PRIVACY
   3. Select FACTORY DATA RESET
   4. Select RESET PHONE
   5. If Password is prompted, enter it, then confirm, select ERASE EVERYTHING

If the device is Frozen, Hang or Unresponsive. You can do a Hard Reset through button combination.
   1. Shut the POWER OFF., take the BATTERY OUT and reinsert it back again after a few seconds.
   2. Hold the VOLUME DOWN BUTTON
   3. Press and hold the POWER BUTTON until the device turns on
   4. A menu will show that let you choose for Fastbook, Recovery, Clear Storage, and Simlock
   5. Just Select CLEAR STORAGE by pressing the VOLUME DOWN button
   6. Then briefly press and release the POWER BUTTON
   7. Then select to confirm: Volume Up for YES and Volume Down for NO

 Once the wipe is complete, the HTC EVO 4G Shift phone will reboot to its factory default state setting. All data you previously installed already cleared.